|
Language
|
This setting will change the language of
the Uconnect system and Instrument Cluster Display. The available
languages are English, Italiano, Français, and Español.
|
|
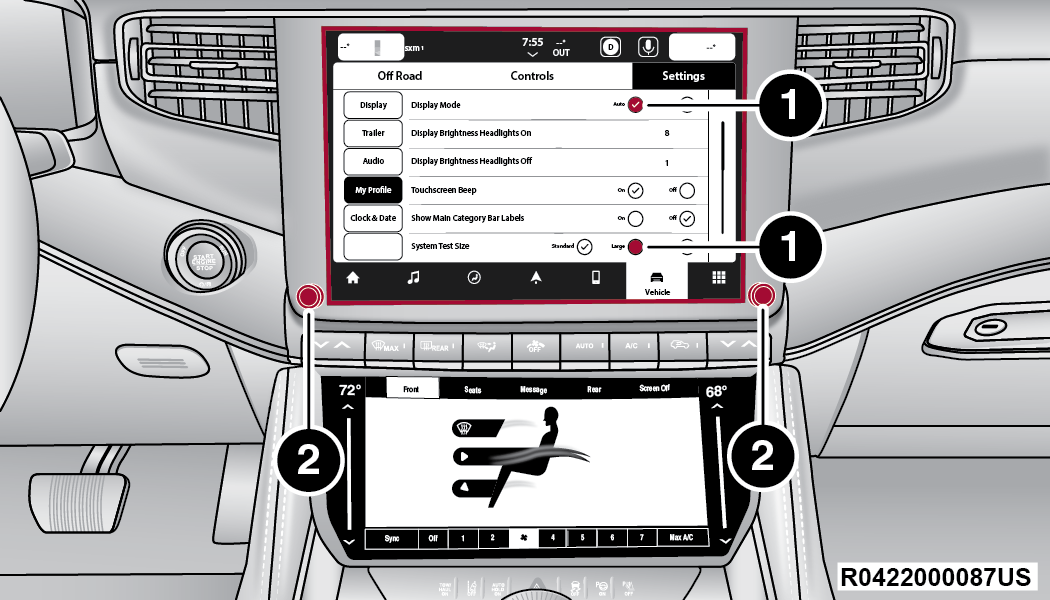
Display
Mode
|
This setting will adjust the display for
the radio to “Auto” or “Manual”. “Manual” allows for more customization
with the radio display.
|
|
Display
Brightness Headlights On
|
This setting will allow you to set the brightness
when the headlights are on. To access this setting, Display Mode
must be set to “Manual”. The “+” setting will increase the brightness;
the “-” will decrease the brightness.
|
|
Display
Brightness Headlights Off
|
This setting will allow you to set the brightness
when the headlights are off. To access this setting, Display Mode
must be set to “Manual”. The “+” setting will increase the brightness;
the “-” will decrease the brightness.
|
|
Units
|
This
setting will allow you to change the units. The available options
are “Speed” (MPH or km/h), “Distance” (mi or km), “Current Consumption”
(MPG [US], MPG [UK], L/100 km, or km/L), “Pressure” (psi, kPa, or
bar), and “Temperature” (°C or °F) units of measurement independently.
|
|
Touchscreen
Beep
|
This setting will allow you to turn the touchscreen
beep on or off.
|
|
Show Main
Category Bar Labels
|
This setting will allow the main category bar
labels to be shown on or off.
|
|
Navigation Next Turn Pop-ups Displayed
In Cluster
|
This
setting will display Navigation prompts in the Instrument Cluster
Display.
|
|
Phone Pop-ups Displayed In Cluster
|
This
setting will display smartphone notifications and messages in the
Instrument Cluster Display.
|
|
Message Pop-ups Displayed with Button
Press
|
This
setting will turn message notifications on or off.
|
|
System
Text Size
|
This setting will allow you to change the text
on the radio to “Standard”, “Large”, or “Taller”.
|
|
Time Format
|
This setting will allow you to set the
time format (AM/PM). Sync Time With GPS must be Off for this setting
to be available. The “12 hrs” setting will set the time to a 12-hour
format. The “24 hrs” setting will set the time to a 24-hour format.
|
|
Voice Options
|
This setting will allow you to change the voice
options for the radio to “Male” or “Female”.
|
|
Wake Up Word
|
This
setting will allow you to set the system’s “Wake Up” word. An available
option is “Hey Uconnect”.
|
|
Voice Barge-in
|
This setting will allow Voice Barge-in
to be turned on or off. For more information about Voice Barge-in,
refer to your Uconnect Owner’s Manual Supplement.
|
|
Show Command
List
|
This setting will allow the Command List
to be shown on or off.
|
|
Ambient Color Personalization
|
This
setting will redirect to a new menu that will allow you to change
the ambient lighting color in the cabin.
|
|
Radio Off Delay
|
This
setting will keep the radio on for the selected amount of time after
vehicle shut off. The available options are “0 sec”, “45 sec”, “5 min”,
and “10 min”.
|
|
Radio Off with Door
|
This
setting will keep the radio on when a door is opened or until the
Radio Off Delay time is reached. The available settings are “On”
and “Off”.
|
|
Key Off Power Delay
|
This
setting will keep certain electrical features running after the
engine is turned off. When any door is opened, the electronics will deactivate.
The available settings are “0 sec”, “45 sec”, “5 min”, and “10 min”.
|
|
App Drawer
Favoriting Pop-ups
|
This setting will allow you to favorite
app drawer pop-ups with “On” and “Off” options.
|
|
App Drawer
Unfavoritings Pop-ups
|
This setting will allow you to unfavorite app
drawer pop-ups with “On” and “Off” options.
|
|
New Text
Message Pop-ups
|
This setting will allow you to have pop-up notifications
for new text messages. Setting options are “On” and “Off”.
|
|
Missed
Calls Message
|
This setting will allow you to have pop-up notifications
for missed calls. Setting options are “On” and “Off”.
|
|
Navigation
Pop-ups
|
This setting will allow you to have pop-up notifications
for Navigation. Setting options are “On” and “Off”.
|
|
Navigation Settings
|
This
setting will redirect to the list of Navigation settings. Refer
to your Uconnect Owner’s Manual Supplement for further information.
|
|
Auto-On Driver Heated/Ventilated Seat
& Heated Steering Wheel With Vehicle Start
|
This
setting will activate the vehicle’s comfort system and heated seats
or heated steering wheel when the vehicle is remote started or ignition
is started. The “Off” setting will not activate the comfort systems.
The “Remote Start” setting will only activate the comfort systems
when using Remote Start. The “All Start” setting will activate the
comfort systems whenever the vehicle is started.
|
|
Audio Settings
|
This
setting will open the submenu containing the audio settings Audio.
|
|
TomTom Traffic And Travel Services
|
This
setting will turn TomTom® Traffic And Travel Services (if equipped)
on or off. An active subscription is required for this feature to work.
|
|
Reset App
Drawer to Default Order
|
This setting will reset the app drawer
to its factory default layout.
|
|
Restore
Settings to Default
|
This setting will return all the previously changed
settings to their factory defaults.
|
|
More Profile
Options
|
This setting will give access to more profile options.
|
|
Theme Mode
|
This setting will allow
you to adjust the brightness of your theme. Setting options are “Light”,
“Dark” and “Auto”. Select to show themes in Light or Dark mode.
“Auto” changes the theme with the headlights.
|