Your vehicle uses an industry standard SAE J1772 charge
inlet (vehicle charge inlet) for both AC Level 1 (120 V) and AC
Level 2 (240 V) charging.
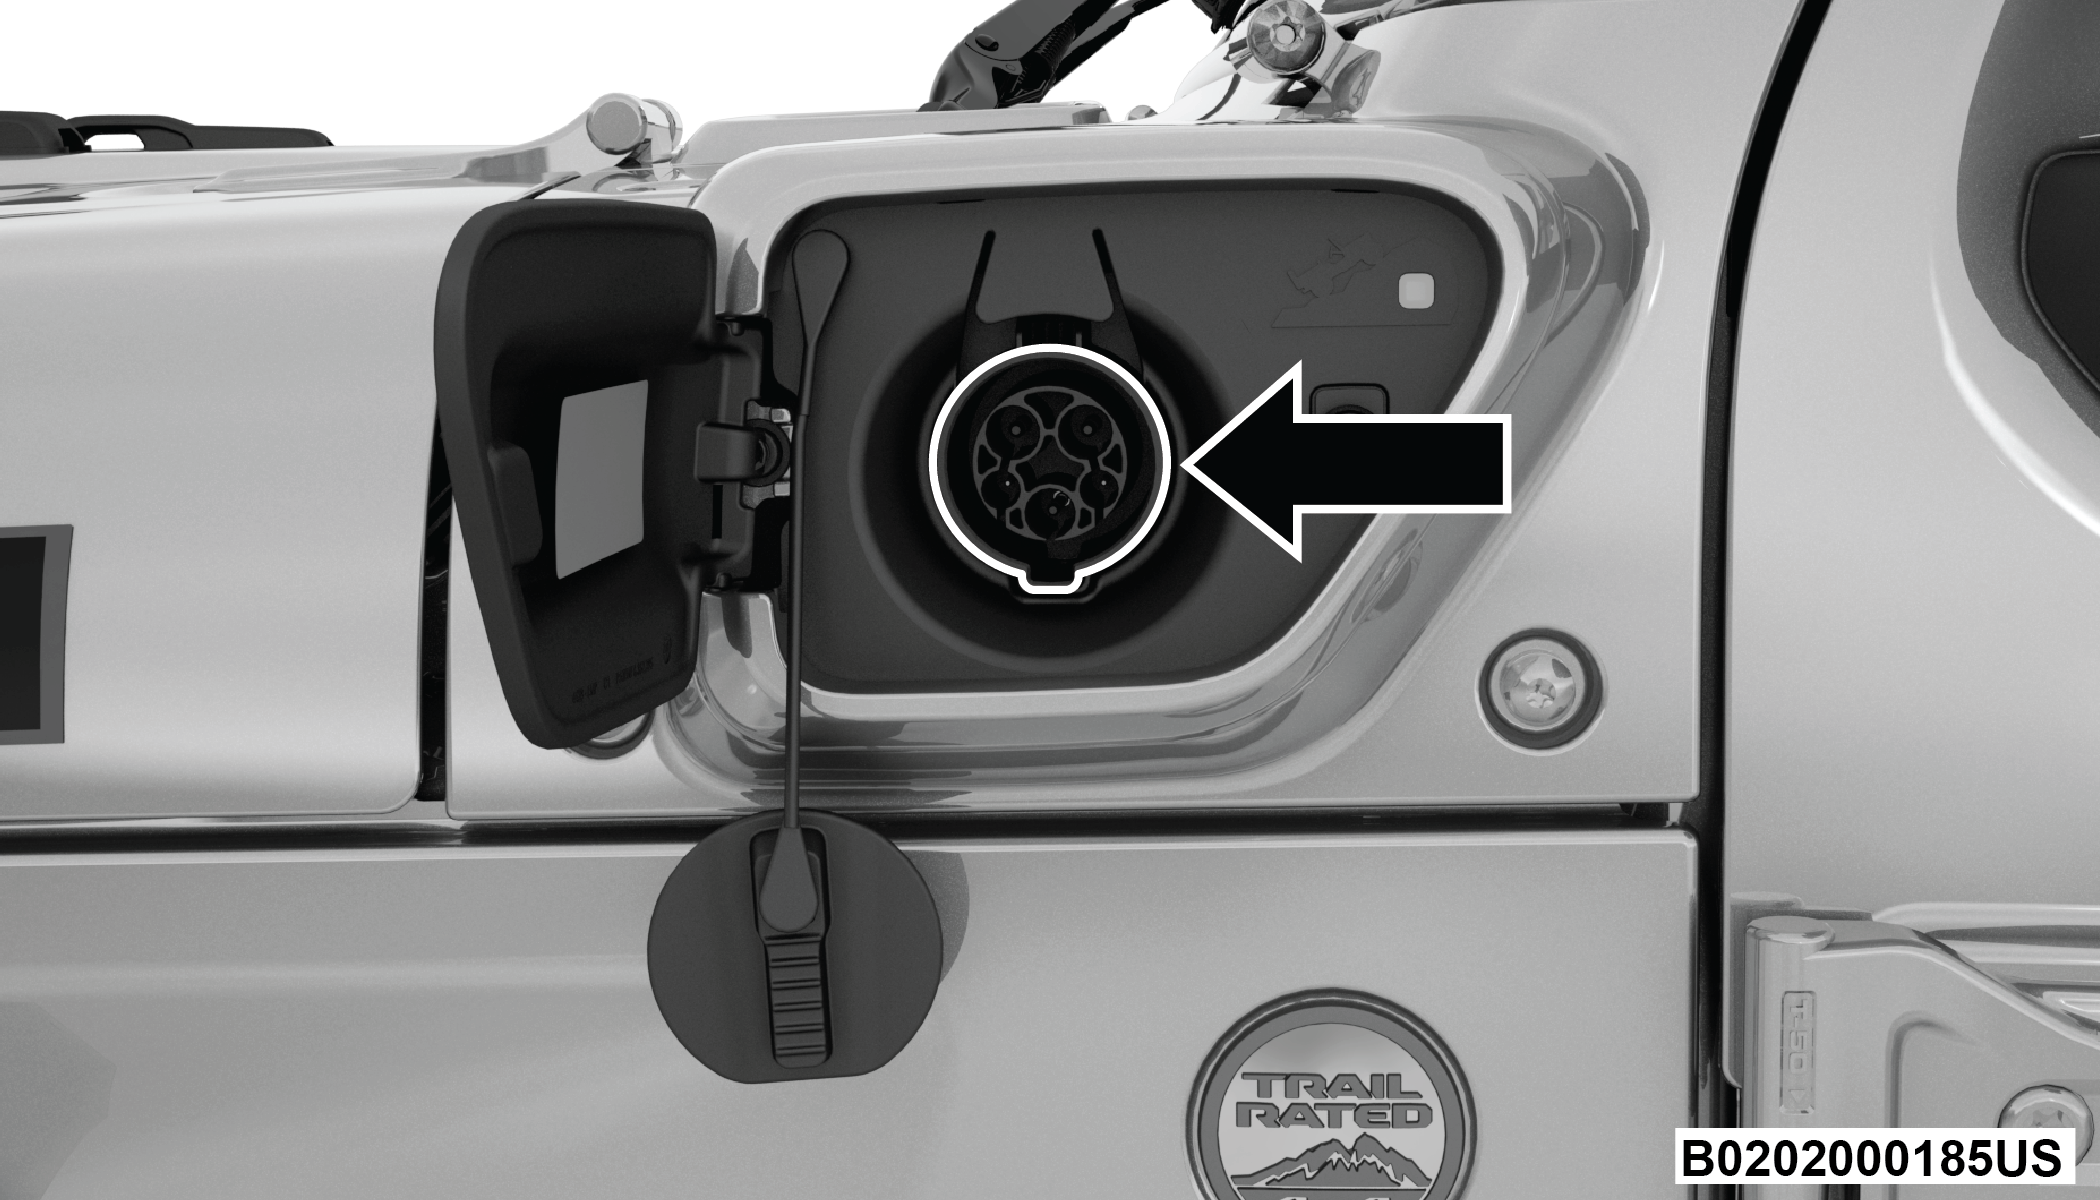
Vehicle Charge Inlet Location
Open the charge port door by pushing near the rear outer edge
of the door, near the center to unlatch. To close the charge port
door, engage the door latch by pushing on the rear outer edge near
the center.
Note:
Only utilize UL-certified (UL 2594) charging equipment to charge your vehicle. Failure to
do so may result in safety hazards.
AC Level 1 Charging (120 Volt, 12 Amp)
Your vehicle is equipped with a 120 Volt AC, SAE J1772
Level 1 Electric Vehicle Supply Equipment (EVSE), also referred
to as a Portable Charging Cordset (EVSE). AC Level 1 charging requires
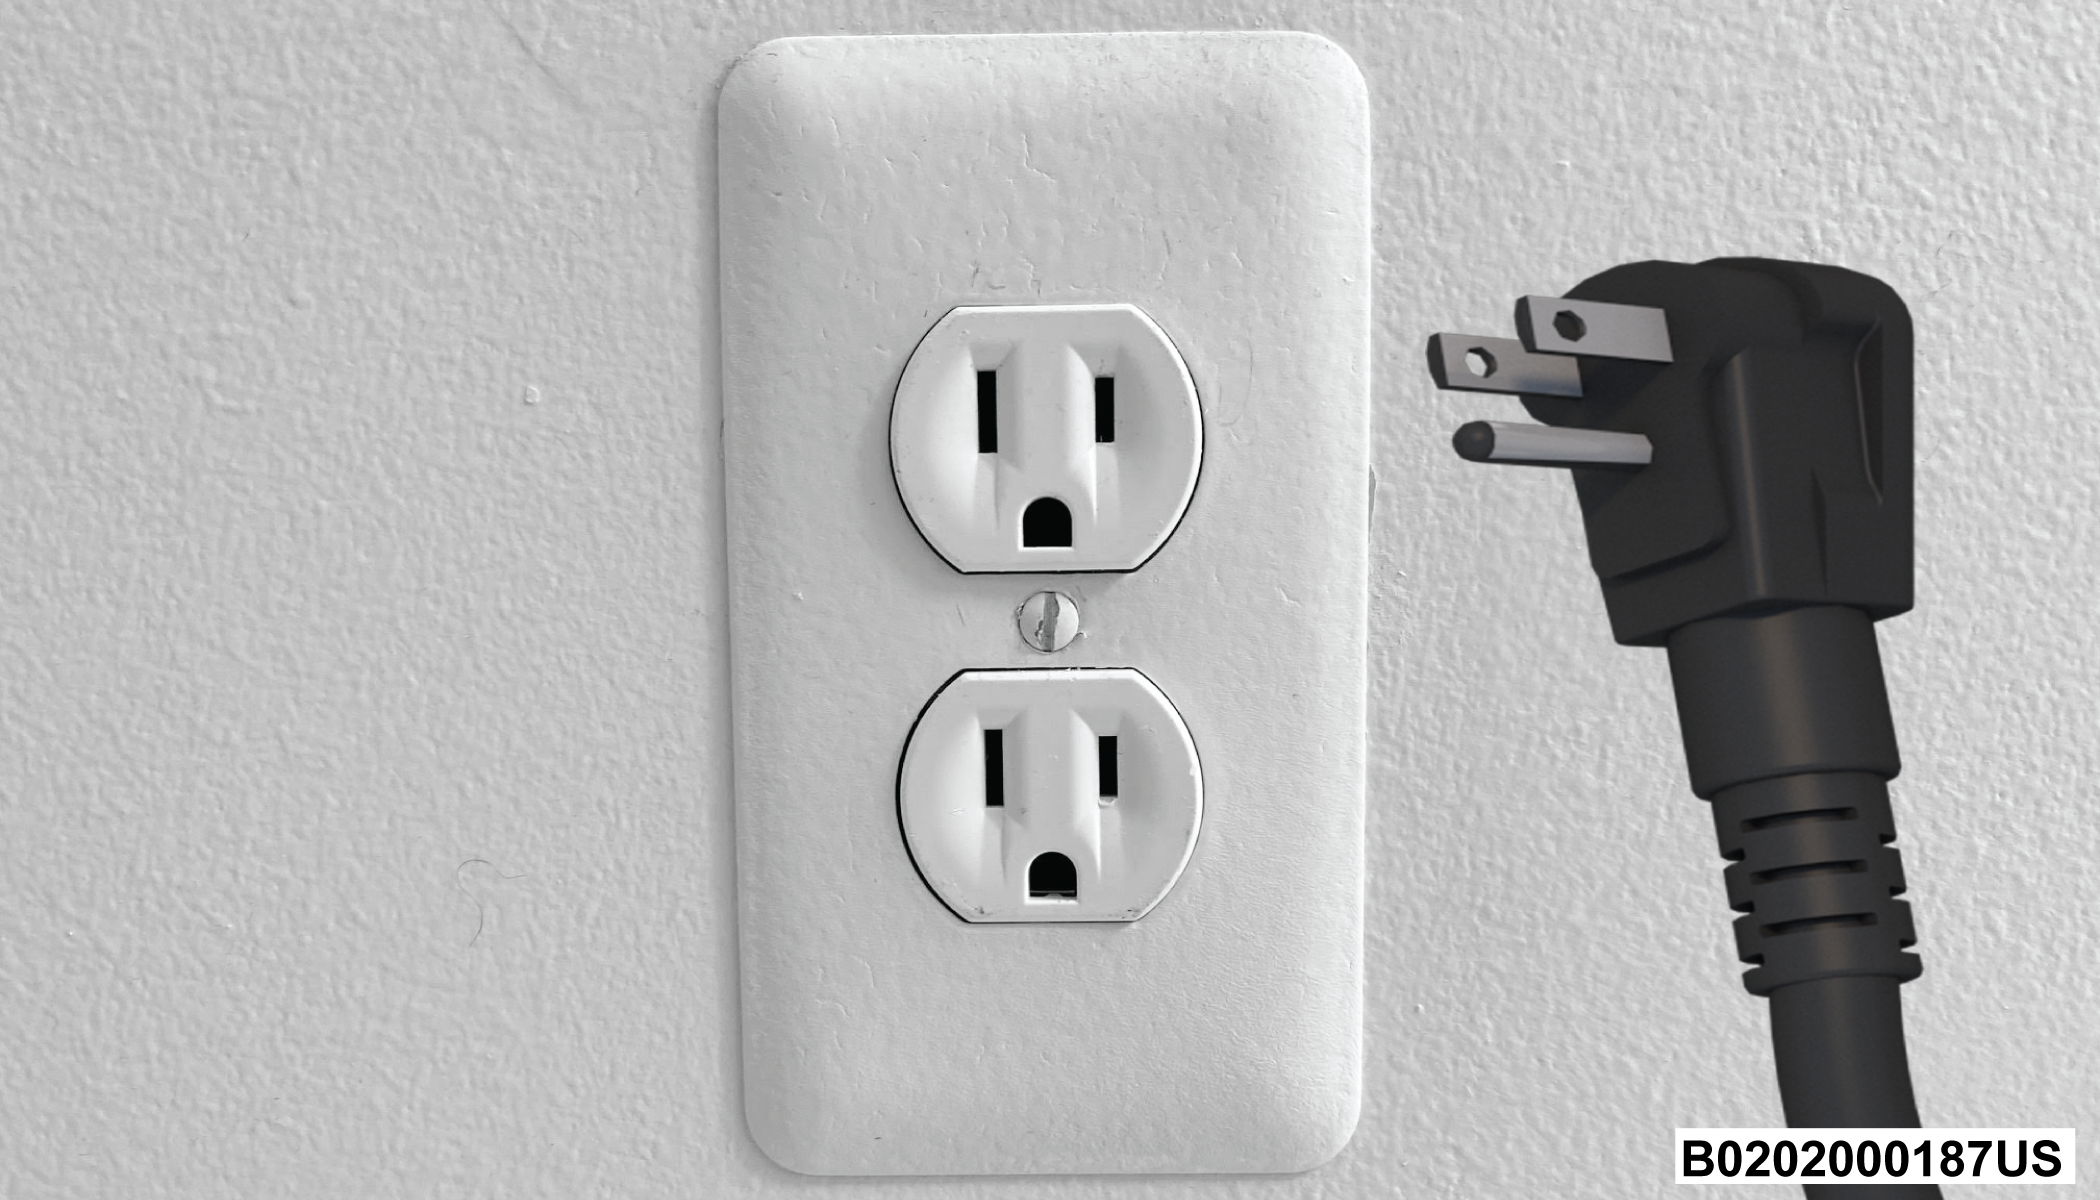
a conventional NEMA 5-15R 120 Volt AC grounded wall outlet along
with the Portable Charging Cordset (EVSE) provided with the vehicle.
Warning:
Please
be sure to follow the warnings below. Failure to do so may result
in serious injury or death
Discontinue use of the
Portable Charging Cordset (EVSE) immediately if the plug or outlet
becomes hot to the touch or if you notice any unusual odors.
Do not use the Portable Charging Cordset (EVSE) in building
structures that use fuse-based circuit protection. Use only with
electrical circuits protected by circuit breakers.
Do not use the Portable Charging Cordset (EVSE) if other
devices are plugged into the same circuit.
When unplugging the Portable Charging Cordset (EVSE) from
the wall outlet, be sure to pull by the plug, and not the cord.
Do not pull, twist, bend, step on or drag the cord of the
Portable Charging Cordset (EVSE).
Stop using the Portable Charging Cordset (EVSE) immediately
if charging stops before it’s completed when the plug or cord is
moved or adjusted.
Do not use the Portable Charging Cordset (EVSE) if the plug
has a loose connection with the wall outlet or if the wall outlet
is damaged or rusted.
If in any doubt about the wall outlet and/or circuit, contact
a qualified electrician.
Do not use if a malfunction occurs or if the Portable Charging
Cordset (EVSE) has been damaged in any manner. It is recommended
that you contact an authorized dealership.
There are no user serviceable parts inside the Portable Charging
Cordset (EVSE). Do not attempt to repair or service the Portable
Charging Cordset (EVSE), doing so will void the New Vehicle Warranty.
Portable Charging Cordset (EVSE)
Warning:
Electrical shock, fire, and other serious
hazards can occur if the Portable Charging Cordset (EVSE) is not used properly. This vehicle
uses a high voltage current. Failure to follow the proper charging instructions in this
publication can cause serious injury or death. There are no serviceable parts in the
Portable Charging Cordset (EVSE). Do not open, disassemble, penetrate, or tamper with the
Portable Charging Cordset (EVSE). Failure to follow this warning can result in electrical
shock, fire, property damage, and death or serious injury.
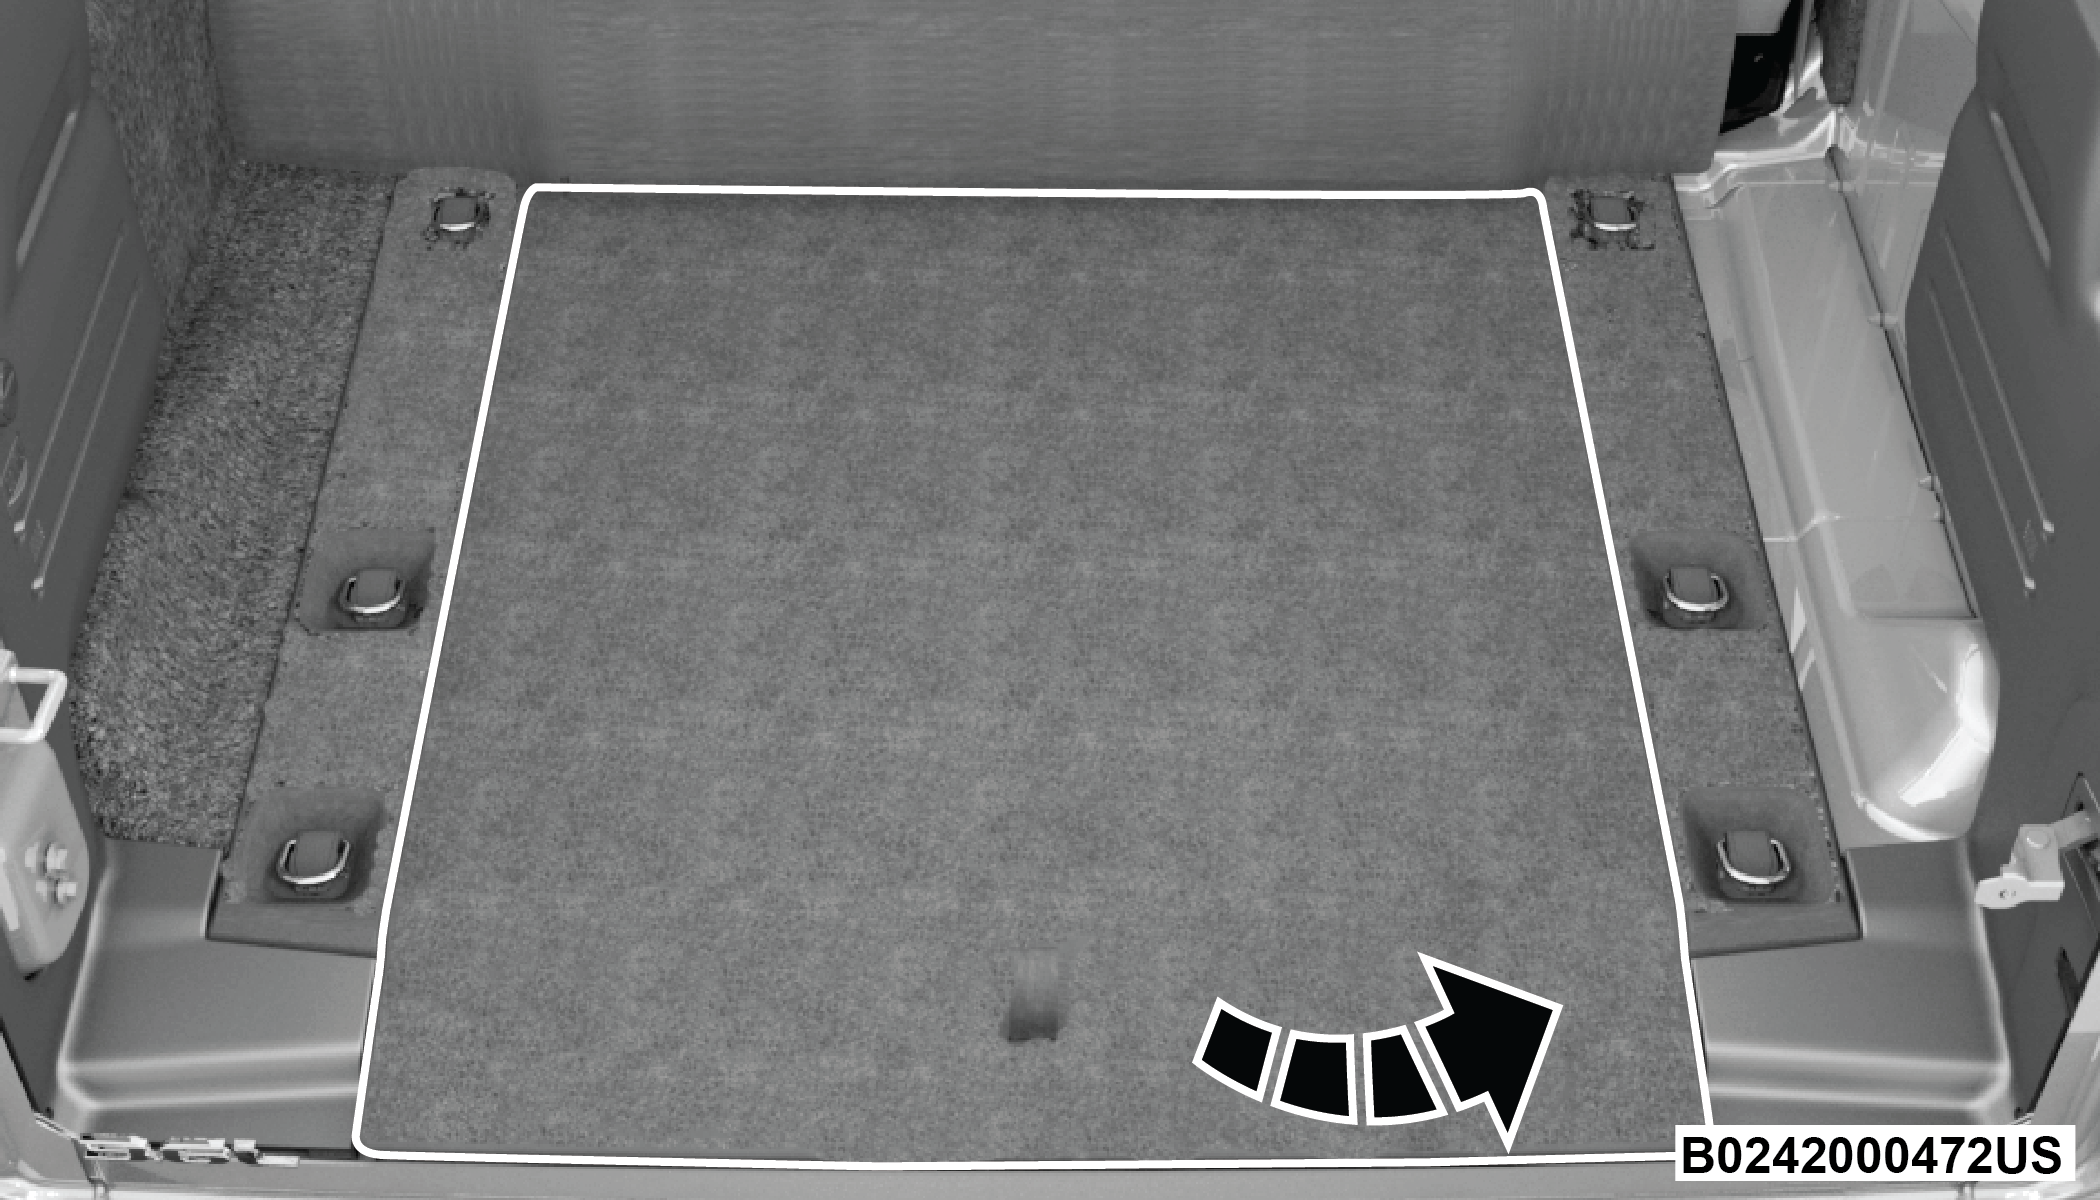
The Portable Charging Cordset (EVSE) is stored in the rear cargo
area below the load floor. To access this area, lift up the cargo
strap of the load floor cover, and remove the Portable Charging
Cordset (EVSE) from the storage bag in the bin below.
Moving, Transporting, And Storage
Instructions
After use, the Portable Charging Cordset (EVSE) should be placed
in the storage bag and put back in the cargo storage area. If the
Portable Charging Cordset (EVSE) will be left outside the vehicle,
be sure to protect the device’s connection end from moisture, dirt,
and debris accumulation and contamination.
Load Floor Cover
Note:
The Portable
Charging Cordset (EVSE) is used for AC Level 1 charging only.
Warning:
Please be sure to follow these warnings.
Failure to do so may result in serious injury or death.
Discontinue use of the Portable Charging
Cordset (EVSE) immediately if the plug or outlet becomes hot to the touch or if you
notice any unusual odors.
Do not use the Portable Charging Cordset
(EVSE) in building structures that use fuse-based circuit protection. Use only with
electrical circuits protected by circuit breakers.
Do not use the Portable Charging Cordset
(EVSE) if other devices are plugged into the same circuit.
When unplugging the Portable Charging
Cordset (EVSE) from the wall outlet, be sure to pull by the plug, and not the cord.
Do not pull, twist, bend, step on or
drag the cord of the Portable Charging Cordset (EVSE).
Stop using the Portable Charging Cordset
(EVSE) immediately if charging stops before it’s completed when the plug or cord is
moved or adjusted.
Do not use the Portable Charging Cordset
(EVSE) if the plug has a loose connection with the wall outlet or if the wall outlet is
damaged or rusted.
If in any doubt about the wall outlet
and/or circuit, contact a qualified electrician.
Do not use if a malfunction occurs or if
the Portable Charging Cordset has been damaged in any manner. It is recommended that you
contact an authorized dealership.
There are no user serviceable parts
inside the Portable Charging Cordset (EVSE). Do not attempt to repair or service the
Portable Charging Cordset (EVSE), doing so will void the New Vehicle Warranty.
Portable Charging Cordset (EVSE)
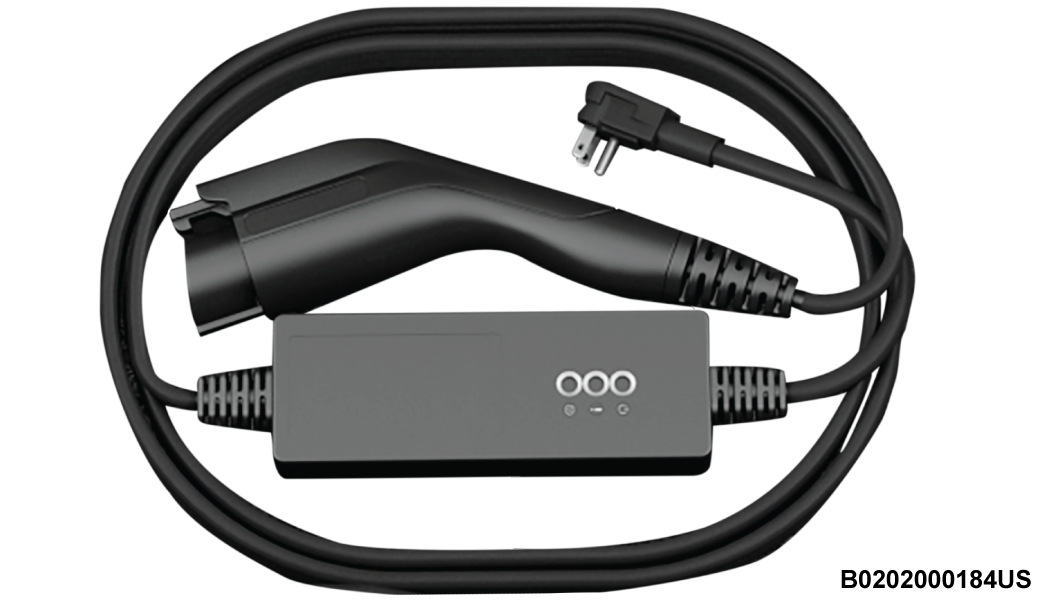
The Portable Charging Cordset (EVSE) is compliant with
SAE J1772, and applicable for use with vehicles fitted with standard
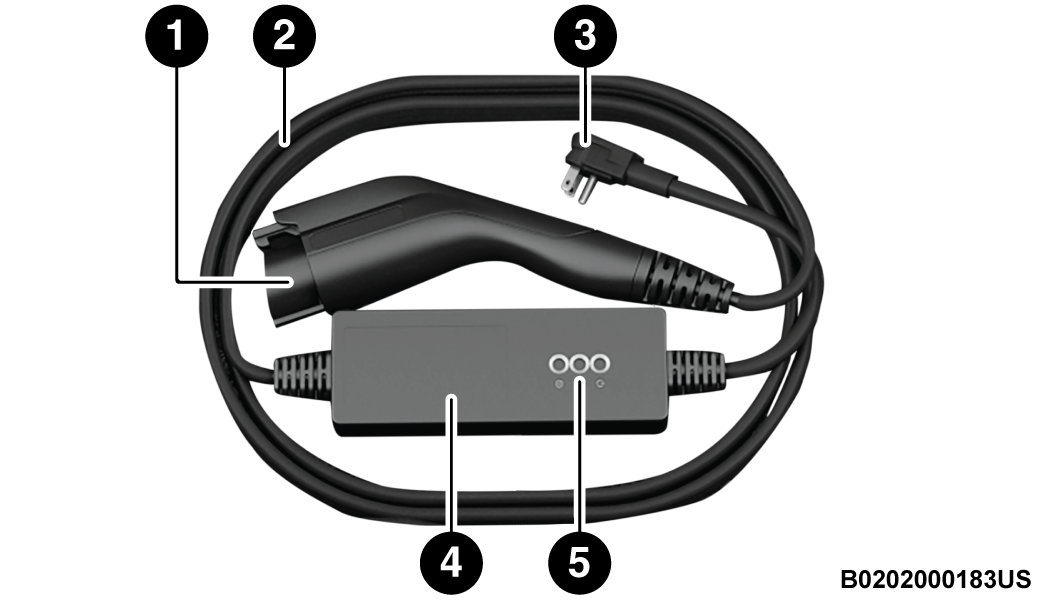
SAE J1772 charge inlets. The Portable Charging Cordset (EVSE) includes:
A Charge Connector
A NEMA 6 rated enclosure with a Charge Current Interrupt
Device (CCID) with status indicator display
An AC Power Cord with a NEMA 5–15P right angle plug
An indoor/outdoor charge cable, EV-rated
A Status Indicator Display
Portable Charging
Cordset (EVSE)
1 — Charge Connector
2 — Charge Cable
3 — AC Plug
4 — EVSE Enclosure
5 — Status Indicator Display
Grounding Instructions
For A Grounded, Cord-Connected Product:
The Portable Charging Cordset (EVSE) must be grounded. If it
should malfunction or break down, grounding provides a path of least
resistance for an electric current to reduce the risk of electric
shock. The Portable Charging Cordset (EVSE) is equipped with a cord
having an equipment-grounding conductor and a grounding plug. The
plug must be plugged into an appropriate outlet that is properly
installed and grounded in accordance with all local codes and ordinances.
Warning:
Do not use the Portable Charging Cordset
(EVSE) on electrical circuits with two-prong outlets; use with improper outlets could result
in electric shock, fire, property damage, and death or serious injury. Check with a
qualified electrician if you are in doubt as to whether the wall outlet is properly
grounded. Do not modify the plug prongs provided with the Portable Charging Corset (EVSE) –
if it does not fit the outlet, you must have a proper outlet installed by a qualified
electrician.
Portable Charging
Cordset (EVSE) Installation And Operating Instructions
Always insert
the AC plug prongs of the Portable Charging Cordset (EVSE) into a
15 A, or 20 A, 120 VAC, 60 Hz, grounded wall outlet first. Do not
use an extension cord, outlet/plug adapter, or a worn outlet. The
Portable Charging Cordset (EVSE) will not operate safely unless it
is plugged directly into the wall outlet.
Note:
The Portable Charging
Cordset (EVSE) should be plugged into a dedicated circuit, not a circuit
shared with other devices drawing electricity on the circuit.
AC Plug And Wall Receptacle
Warning:
Do not use the Portable Charging Cordset
(EVSE) on electrical circuits with two-prong outlets; use with improper outlets could result
in electric shock, fire, property damage, and death or serious injury. Check with a
qualified electrician if you are in doubt as to whether the wall outlet is properly
grounded. Do not modify the plug prongs provided with the Portable Charging Corset (EVSE) –
if it does not fit the outlet, you must have a proper outlet installed by a qualified
electrician.
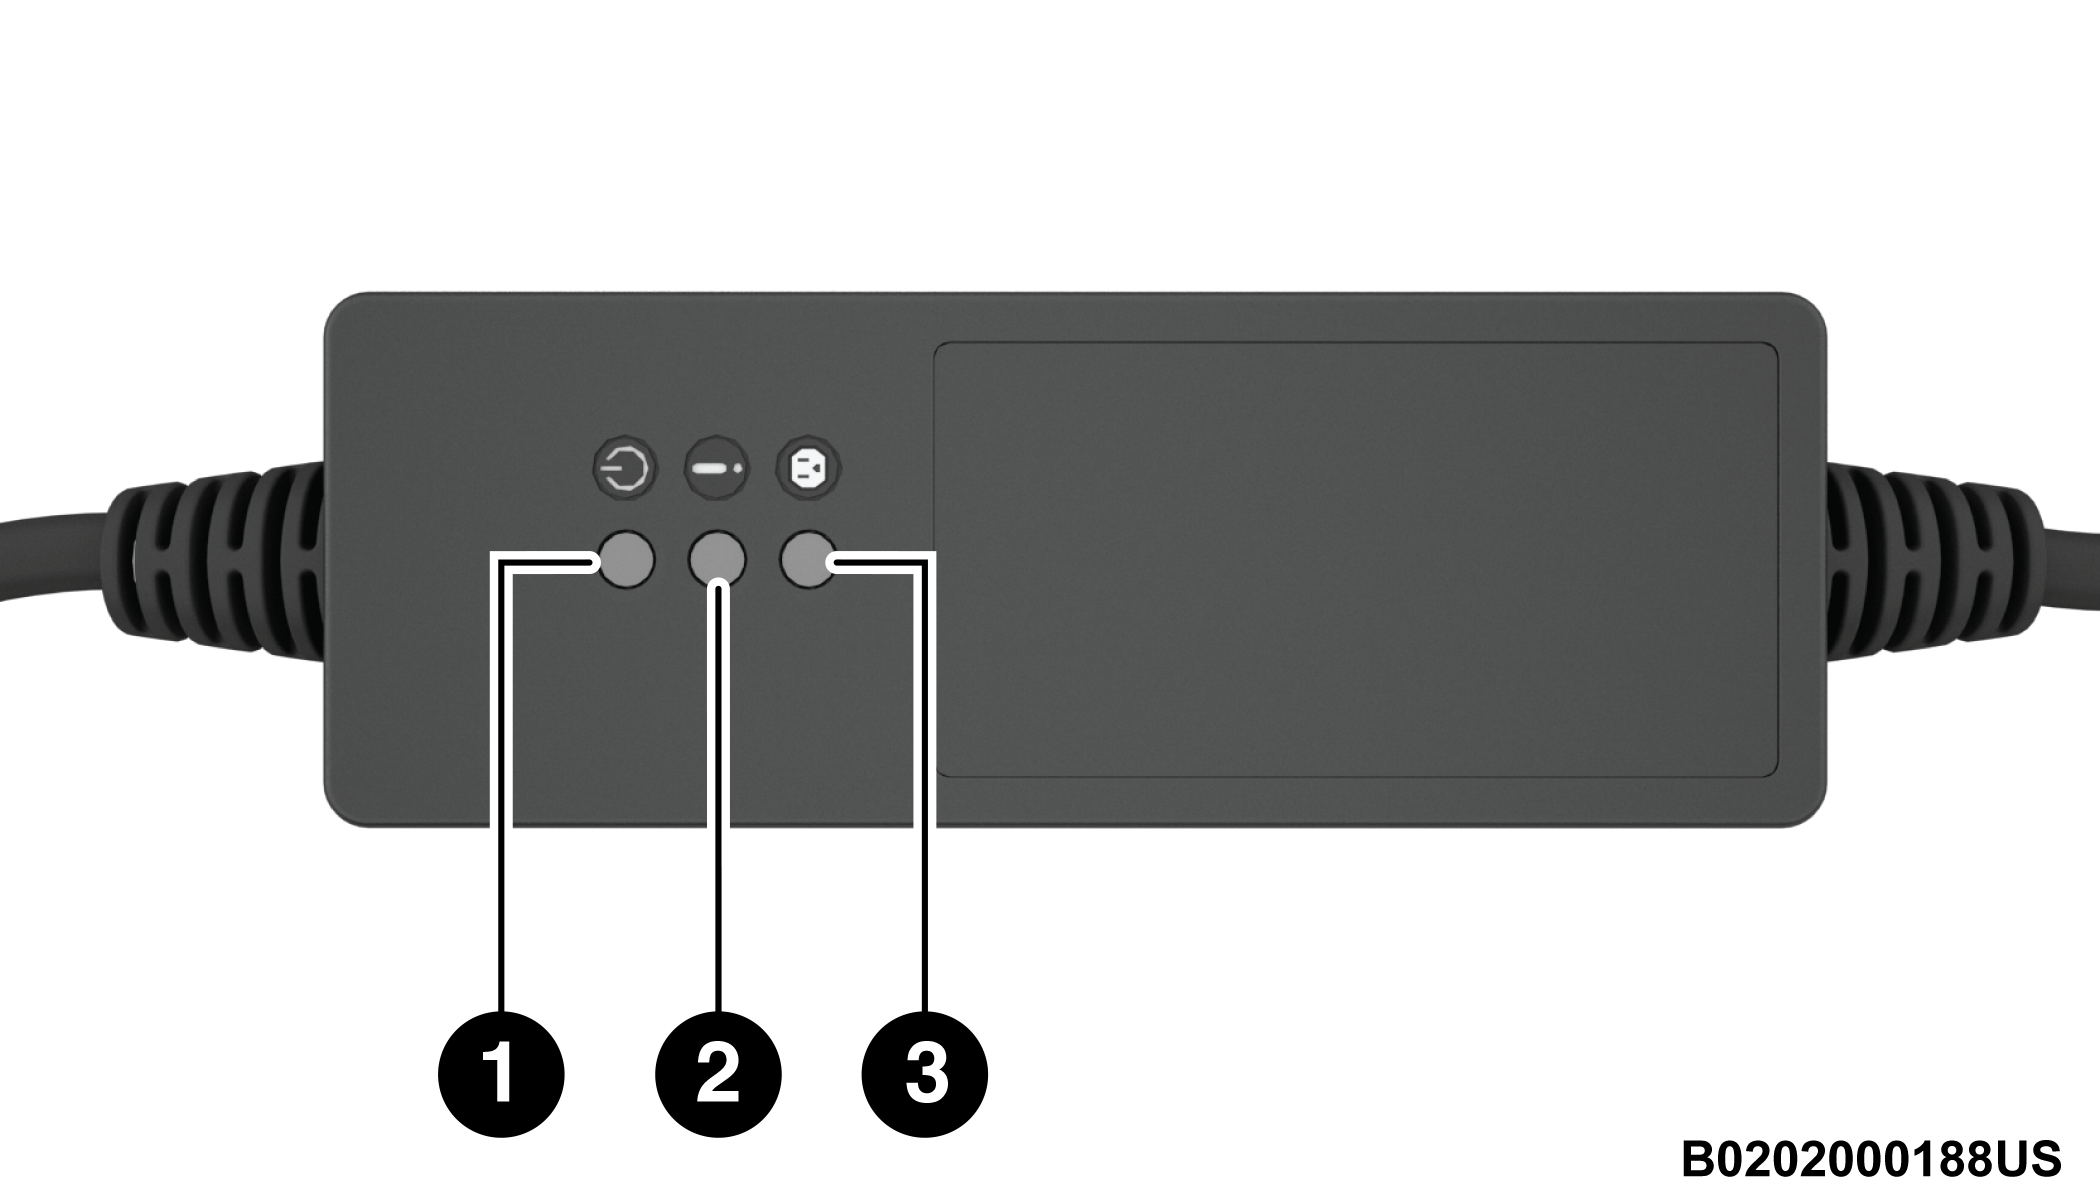
Check to see
if the Portable Charging Cordset (EVSE) is ready to charge by reviewing
the indicator lights.
Portable Charging
Cordset (EVSE) Indicator Lights
1 — AC Power Indicator Light
2 — Fault Indicator Light
3 — Check Outlet Indicator Light
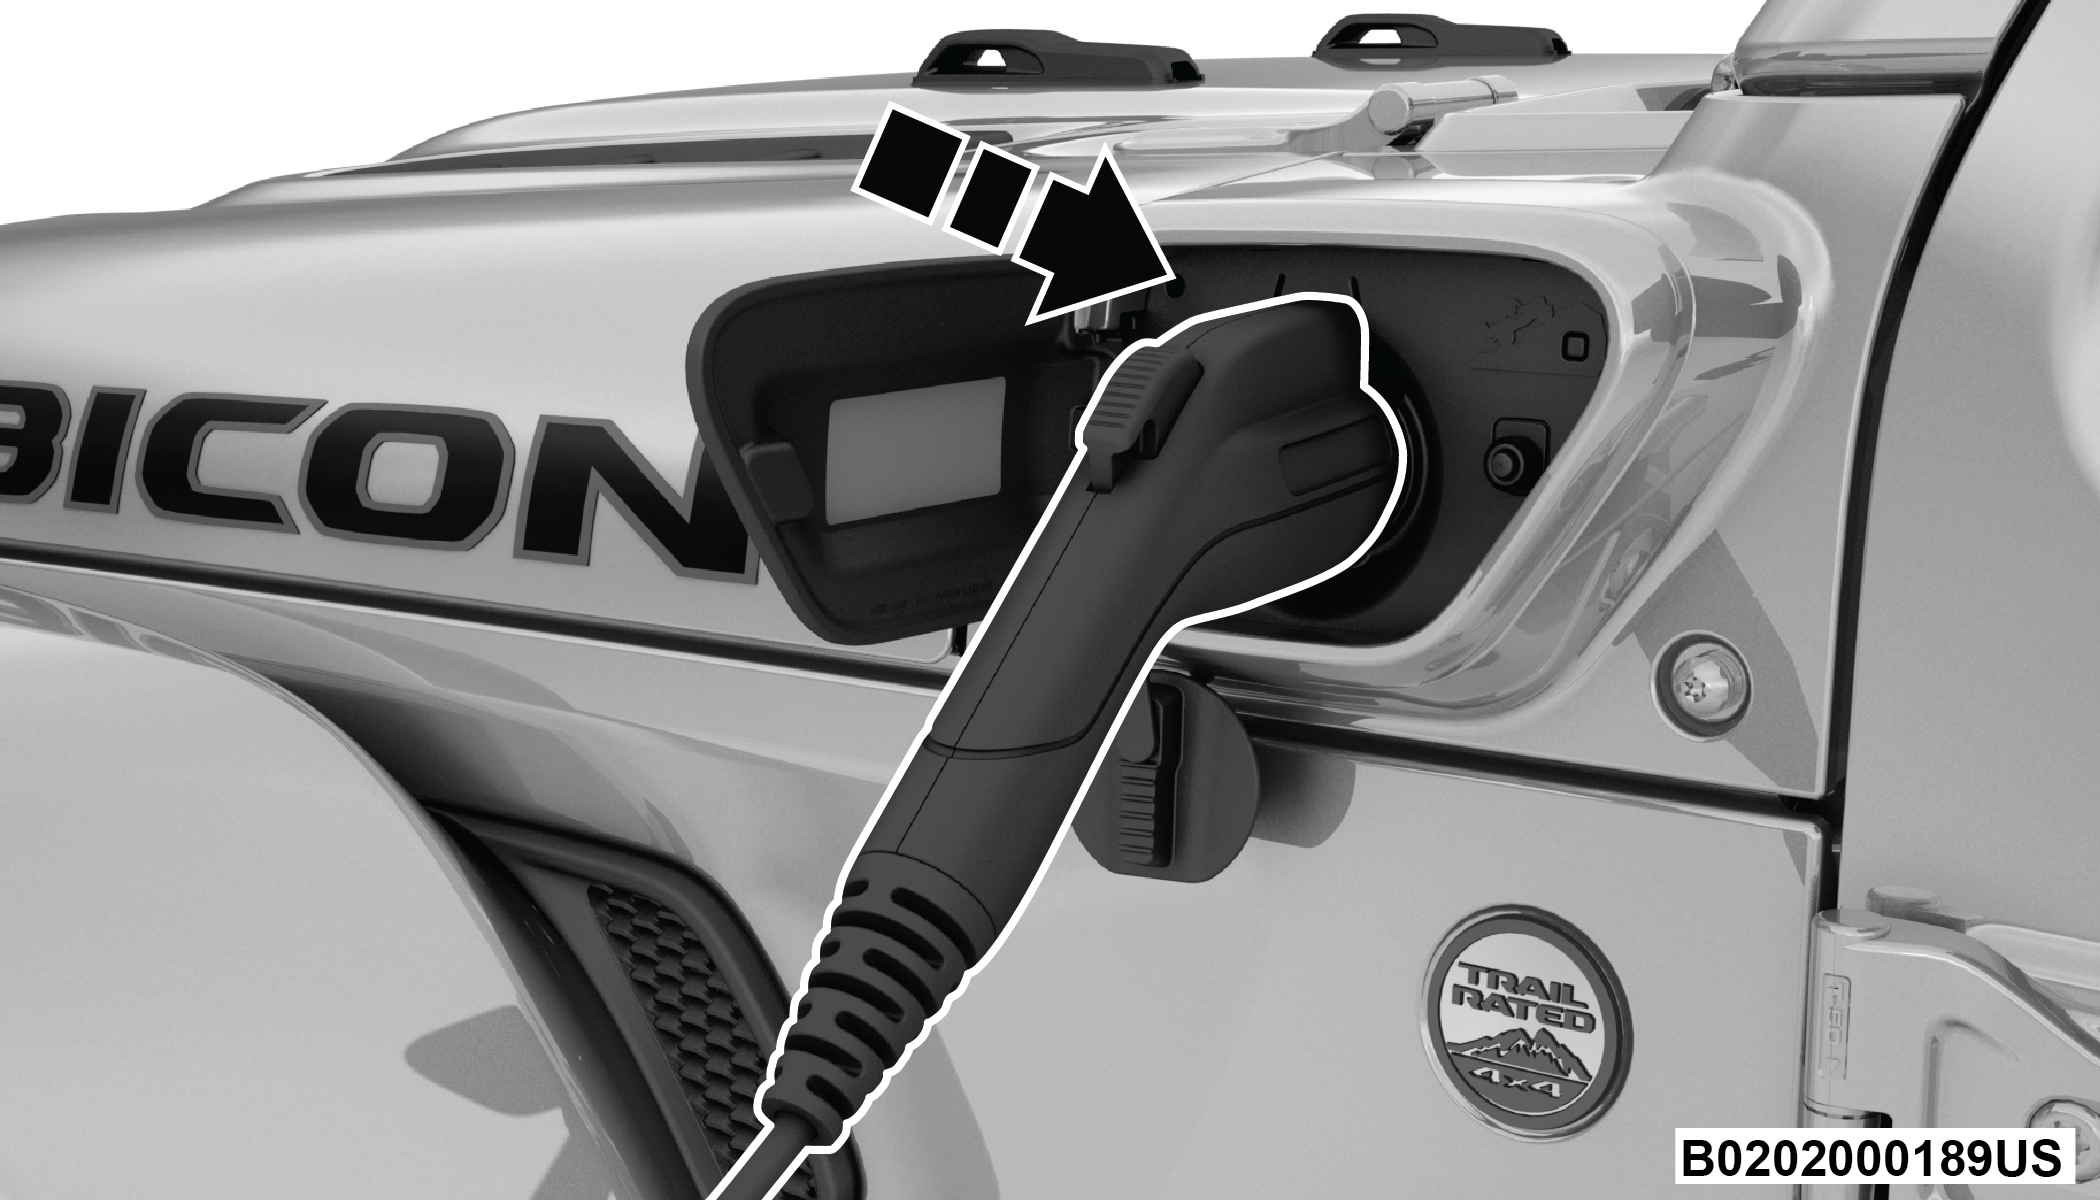
If the Portable
Charging Cordset (EVSE) is ready to charge, ensure the vehicle is
in PARK, and then connect the charge connector to the vehicle’s charge
inlet. You will hear a “click” when the charge connector is inserted
correctly and coupled with the vehicle’s charge inlet.
Inserting The Charge Connector Into The Vehicle Charge Inlet
When the vehicle
commences charging, the green indicator light will turn on.
Note:
The vehicle should
start charging automatically. If not, please check the following:
Portable Charging Cordset
(EVSE) — The Portable Charging Cordset (EVSE) status indicator lights
illuminate green, red, or yellow to identify the charging status Troubleshooting Using The Status Indicator Display.
Wall Outlet
— Check whether the wall outlet is functional (no power outage) and/or
plug the Portable Charging Cordset (EVSE) into a different wall outlet.
Charging Schedule
— Check whether the charging schedules have been enabled. If enabled,
check that you are within the scheduled time and day of the week.
If a charging schedule has been enabled in the vehicle, and it is
outside the time and day of the week, you may override the schedule
for this charging event by plugging in the charge connector, unplugging
it, and then plugging it back into the vehicle charge inlet. Complete
the double plug sequence within 10 seconds for it to override the
set schedule.
Hood Ajar —
Check whether the hood is open. Charging is disabled while the hood
is open, and will resume when the hood closes.
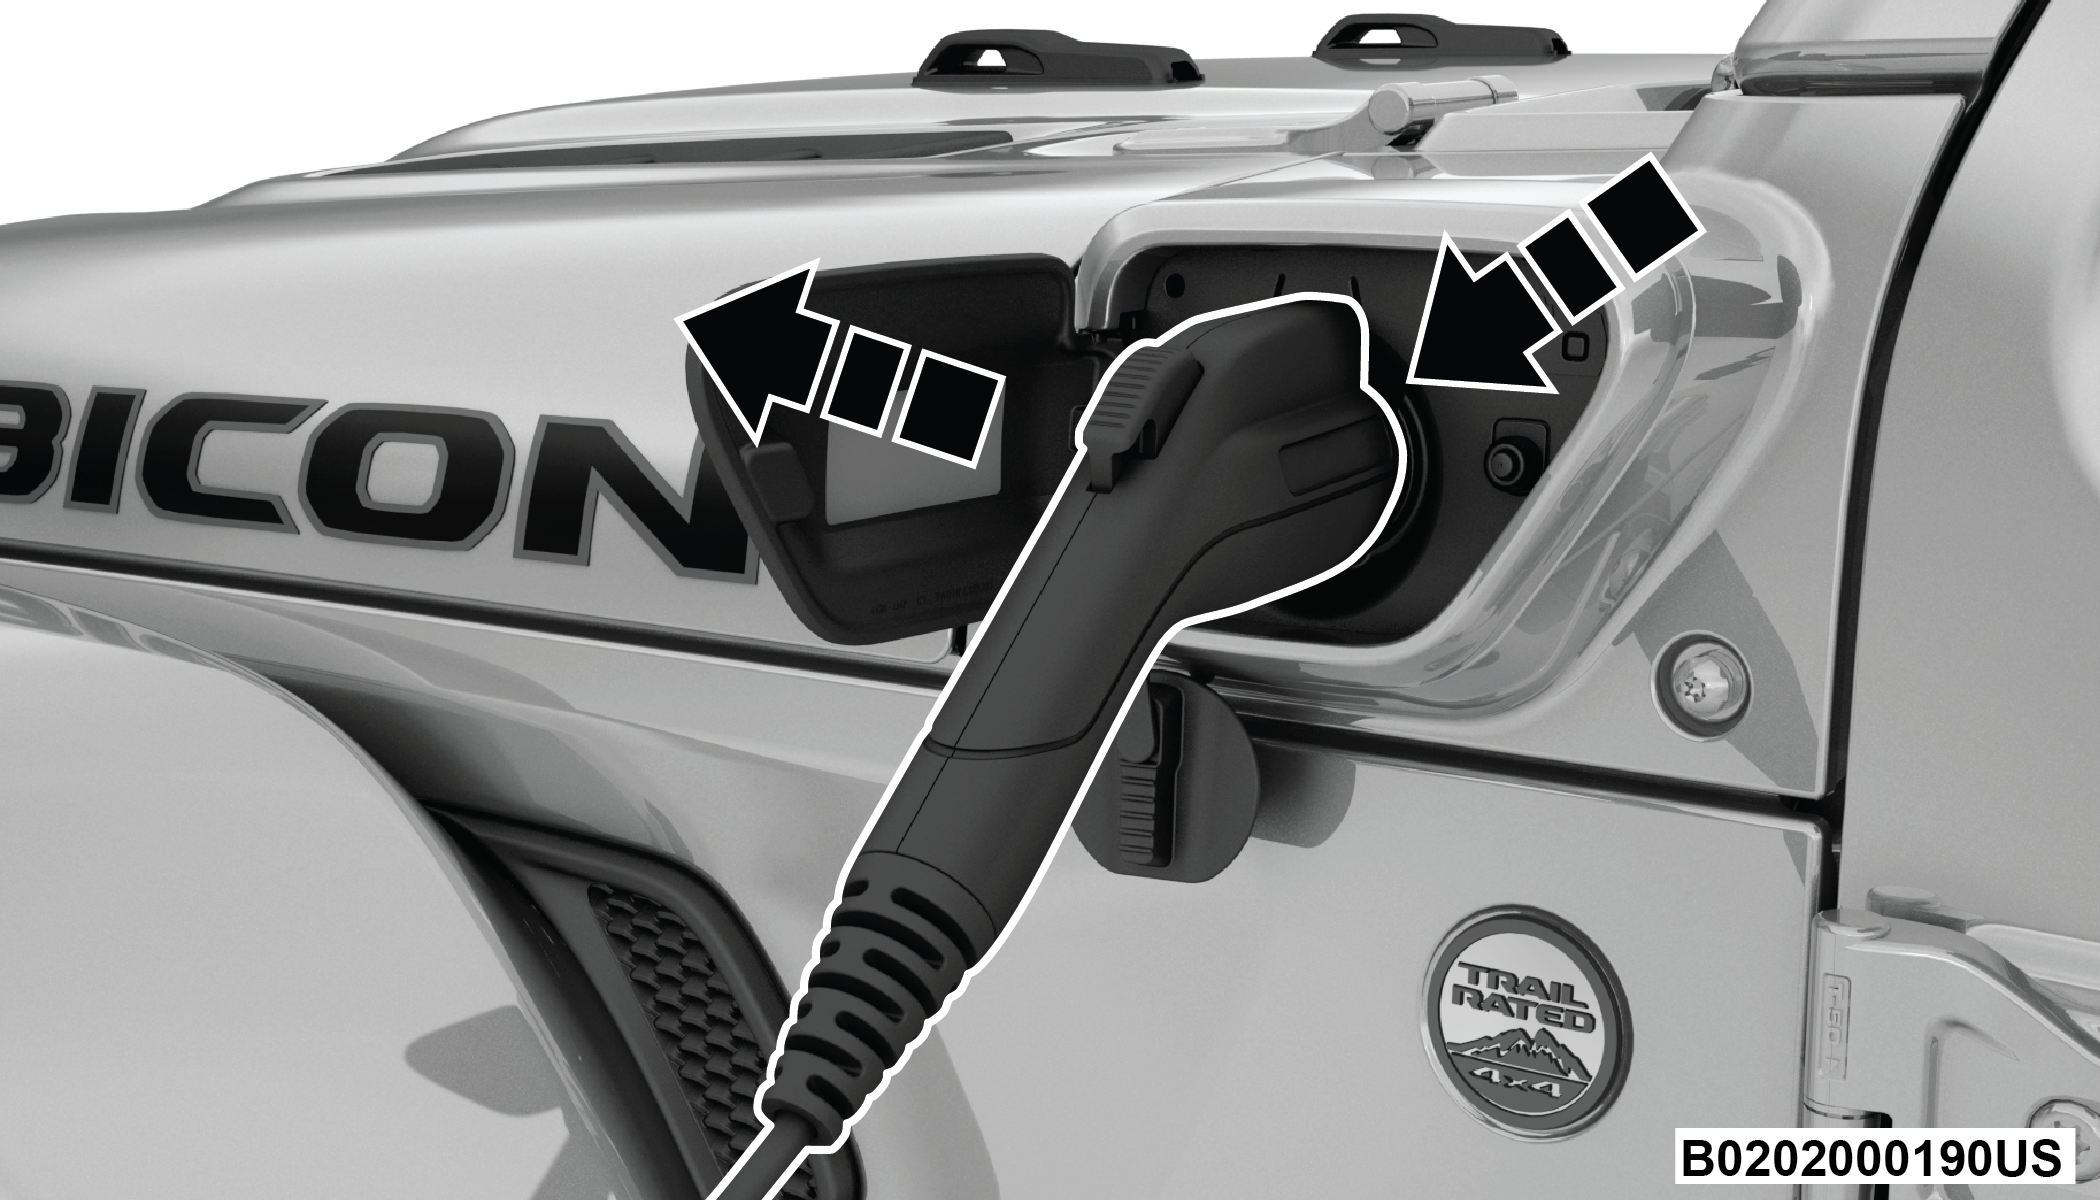
To stop the
charging process, disconnect the Portable Charging Cordset (EVSE)
from the vehicle first, and then from the wall outlet. To disengage
the vehicle coupler, push the button on the connector.
Removing The Charge Connector From The Vehicle Charge Inlet
Close the inlet
door when a Portable Charging Cordset (EVSE) is not connected to the
vehicle.
Note:
It is good practice
to keep the ignition in the OFF position while conducting Level 1
charging. This minimizes any additional vehicle loads the Portable
Charging Cordset (EVSE) has to support. The additional electrical
loads will extend the high voltage battery charging time.
Troubleshooting Using The Status Indicator Display
If the vehicle is not charging properly, consult the status indicator lights.
The Green LED signals correct operation of the system.
The Red LED signals a failure in the charging system.
The Yellow LED signals a failure with the outlet.
LED Indicator Lights
1 — Green LED
2 — Red LED
3 — Yellow LED
Any faults in charging are displayed by the LEDs, either steady or flashing, located on the status indicator display of the Portable Charging Cordset (EVSE). Refer to the following troubleshooting table.
Portable Charging
Cordset (EVSE) Charging System Failure Troubleshooting
Green LED
Red LED
Yellow LED
Description
Action/Consequences
OFF
OFF
OFF
Portable Charging
Cordset (EVSE) not connected to the domestic charging outlet or
power failure in the domestic power supply mains.
ON
OFF
OFF
There are no faults in
the domestic power supply mains, so the Portable Charging Cordset
(EVSE) can be connected to the charge inlet on the vehicle.
ON
ON (Flashing)
ON
Overheating at the
charging outlet of the domestic power supply mains.
When the normal
temperature is reached, the system will make a new charge attempt at
a lower current level.
ON
OFF
ON (Flashing)
Charging to a lower
current level due to overheating of the charging outlet of the
domestic power supply mains.
ON
ON
ON (Flashing)
Overheating at the
charging outlet of the domestic power supply mains.
Carefully disconnect
the Portable Charging Cordset (EVSE) from both the vehicle and power
outlet and wait for the plug and outlet to return to normal
temperatures. Then, reconnect the Portable Charging Cordset (EVSE)
to the power outlet and vehicle and charge again.
Contact a qualified
electrician in case of a new anomaly.
ON
ON (2 Blinks)
ON (2 Blinks)
Lack of grounding
cable in the charging outlet of the domestic power supply mains.
The system will make a
new charge attempt after 30 seconds (6 attempts in total).
ON
ON
ON (2 Blinks)
Lack of grounding
cable in the charging outlet of the domestic power supply mains.
The new charge attempt
failed. Disconnect the Portable Charging Cordset (EVSE) from the
vehicle and the outlet and reconnect it, then try to charge
again.
Contact a qualified
electrician in case of a new anomaly.
ON (Flashing)
OFF
OFF
Domestic mains power
incorrectly supplied.
The system will make a
new charge attempt after 30 seconds (6 attempts total).
If the fault persists,
disconnect the Portable Charging Cordset (EVSE) from the vehicle and
the outlet and reconnect it, then try to charge again.
Contact a qualified
electrician in case of a new anomaly.
ON
ON (Flashing)
OFF
Charge Current
Interrupt Device (CCID) fault trip over one second after relay
closure. Portable Charging Cordset (EVSE) retrying to charge the
vehicle.
The system will make a
new charge attempt after 30 seconds (6 attempts in total).
ON
ON
OFF
Charge Current
Interrupt Device (CCID) fault, Retry Exhausted or Retry is
disallowed if trips within one second of relay closure.
The new charge attempt
failed. Disconnect the Portable Charging Cordset (EVSE) from the
vehicle and the outlet and reconnect it, then try to charge
again.
Contact an authorized
dealership in case of a new anomaly.
ON
ON
OFF
Dispersion of the
electricity on the vehicle.
Disconnect the
Portable Charging Cordset (EVSE) from the vehicle and the outlet and
reconnect it, then try to charge again.
Contact an authorized
dealership in case of a new anomaly.
ON
ON (Flashing)
OFF
Electric charging
current too high.
The system will make a
new charge attempt after 30 seconds (6 attempts total).
ON
ON (7 Blinks)
OFF
Electric charging
current too high.
The new charge attempt
failed. Disconnect the Portable Charging Cordset (EVSE) from the
vehicle and the outlet and reconnect it, then try to charge
again.
Contact an authorized
dealership in case of a new anomaly.
ON
ON (2 Blinks)
OFF
Charging abnormality
on the vehicle.
The system will make a
new charge attempt after 30 seconds (6 attempts total).
If the fault persists,
disconnect the Portable Charging Cordset (EVSE) from the vehicle and
the domestic power outlet and reconnect it, then try to charge
again.
Contact an authorized
dealership in case of a new anomaly.
ON
ON (3 Blinks)
OFF
Portable Charging
Cordset (EVSE) failure.
ON
ON (4 Blinks)
OFF
ON
ON (5 Blinks)
OFF
ON
ON (6 Blinks)
OFF
Guidelines for preventing fire and electric shock:
Ensure the Portable Charging Cordset (EVSE) is positioned so it will not be stepped on, tripped over, or otherwise subjected to damage or stress.
There are no user serviceable parts inside.
Do not use the Portable Charging Cordset (EVSE) if it is visibly damaged. Contact an authorized dealership for service.
Do not place fingers, or any other objects inside the charge connector.
Do not allow children to operate the Portable Charging Cordset (EVSE). Adult supervision is mandatory when children are in proximity when the Portable Charging Cordset (EVSE) is in use.
Do not use the Portable Charging Cordset (EVSE) with an extension cord or plug adapters.
Do not unplug the Portable Charging Cordset (EVSE) from the wall outlet during a charging operation.
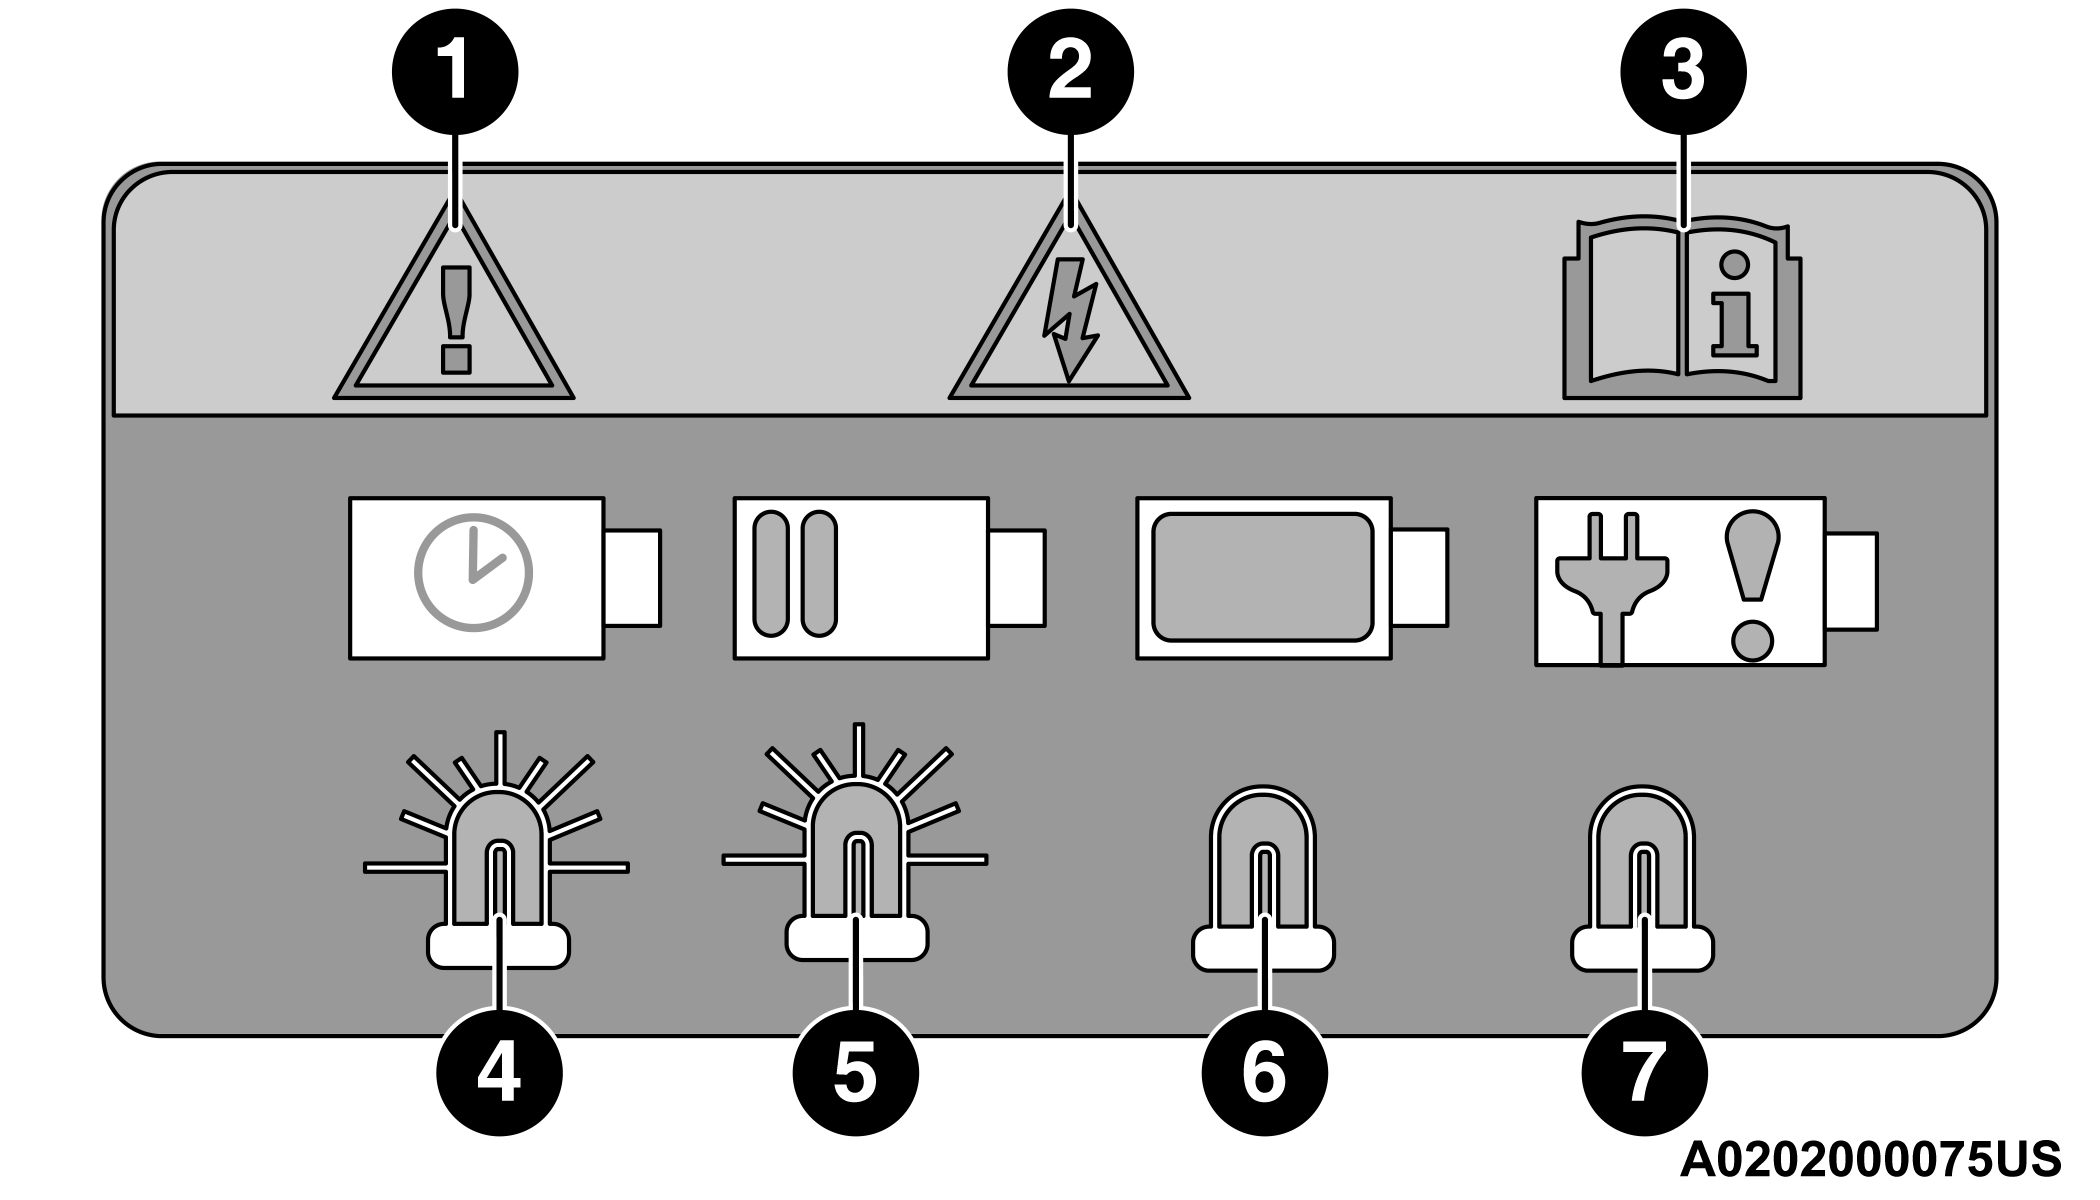
Charging Inlet Warning Label
1 — Dangerous Situation
2 — Risk Of Electric Shock
3 — Reference Owner’s Information
4 — Charging Timer Set
5 — Charging Procedure In Progress
6 — Charging Procedure Complete
7 — Fault In Charging Procedure
Note:
During normal operation, the charge connector or
AC plug may feel warm. If either one feels hot during charging, unplug the Portable
Charging Cordset (EVSE) and have a qualified electrician inspect the wall outlet
before you continue charging General Information.
Warning:
Do not use the Portable Charging Cordset
(EVSE) with an outlet that is worn or damaged. Failure to follow this warning can result in
electrical shock, fire, property damage, and death or serious injury.
AC Level 2 Charging (240 Volt, 40 Amp)
AC Level 2 (240 V) charging requires a 240 V,
Level 2 Electric Vehicle Supply Equipment (EVSE) charging station. We recommend using a Level
2 EVSE charger with up to 48 amps for home installation.
When using public charging stations, ensure the charging station
is ready to provide charge and the vehicle is in PARK before the
Level 2 EVSE is plugged into the vehicle’s charge inlet. You will
hear a “click” when the charge connector is inserted correctly and
is coupled with the vehicle’s charge inlet.
Note:
The vehicle
should start charging automatically. If not, please check the following:
Charging Station — Check the indications and instructions
at the charging station.
Charging Schedule — Check whether the charging schedule is
enabled and if so, whether the vehicle is currently within the scheduled
charge time/day (weekday/weekend). If the charging schedule is enabled
within the vehicle, you may override it for this charging event
by plugging in the charge connector, unplugging it, and then plugging
it back into the vehicle charge inlet. Complete the double plug
sequence within 10 seconds for it to override the set schedule.
Hood Ajar — Check whether the hood is open. Charging is disabled
while the hood is open, and will resume when the hood closes.
To stop the
charging process:
Press the “STOP” button located on the front of the EVSE
station.
Press the button located on the Level 2 EVSE vehicle connector.
Remove the connector from the vehicle charge inlet.
Plug the charge handle into the Level 2 EVSE station and
coil the charging cord onto its holder. Do not leave the charging
cord lying on the ground.
Charging Times
The following
factors determine the time it takes to charge the high voltage battery:
The high voltage battery’s current state of charge
The type of Electric Vehicle Supply Equipment (EVSE) used
(Level 1 – 120 V or Level 2 – 240 V)
Ambient temperature
Whether the vehicle’s ignition is in the RUN position during
charging
Note:
The
following charging times are estimates based on charging a high
voltage battery that has a <1% State Of Charge (SOC) value displayed
in the instrument cluster.
Charging times will vary based on the age, condition, SOC,
available current being provided to the charger from its energy
source, and temperature of the high voltage battery.
Charging times may be longer if a thermal self-protection
reduces the charging current from the EVSE being used.
If the vehicle’s ignition is in either the ACC or RUN position,
the vehicle charge indicator may not indicate greater than a 99%
SOC and will continue to charge the vehicle, due to the vehicle
loads.
Type
of EVSE
Estimated
Charge Time
Level 1 (120 V/15 A)
Approximately 12 hours
Level 2 (240 V/30 A or 32 A)
Approximately 2 hours
Vehicle Charge Indicators
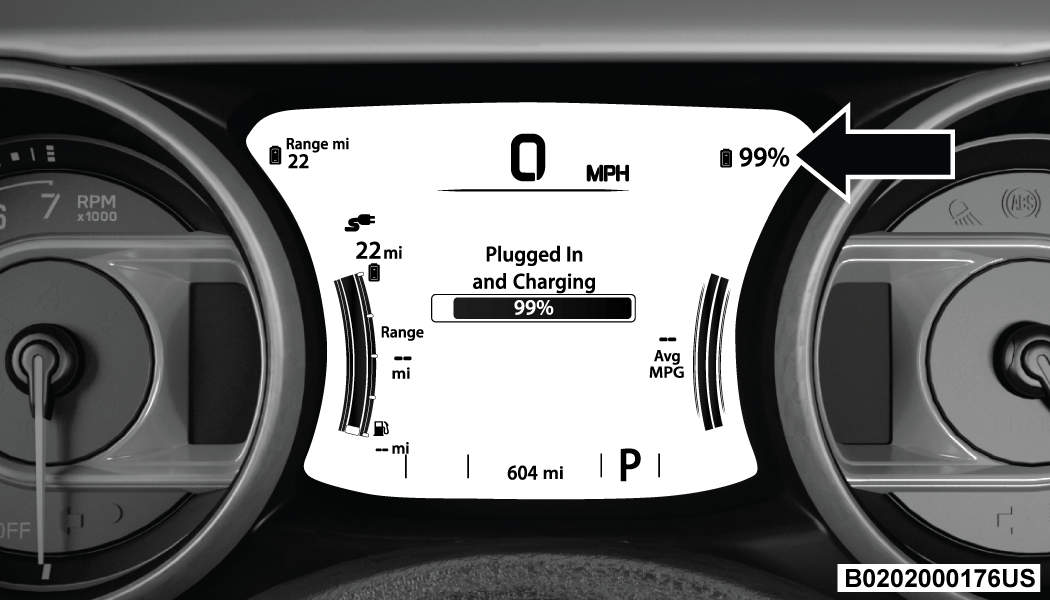
Instrument Cluster High Voltage
Battery Display
There is a battery display indicator located on the instrument cluster. The battery display will indicate the current State Of Charge (SOC) for the high voltage battery; with the percentage value located to the right of the symbol. When plugged in, the battery symbol also indicates the battery level along with messages about the charge or whether the system is waiting to charge due to the charge schedule. These will appear unless there is a charging fault. A green plug telltale will be shown in the cluster, as well as applicable messaging when charging.
High Voltage Battery Display
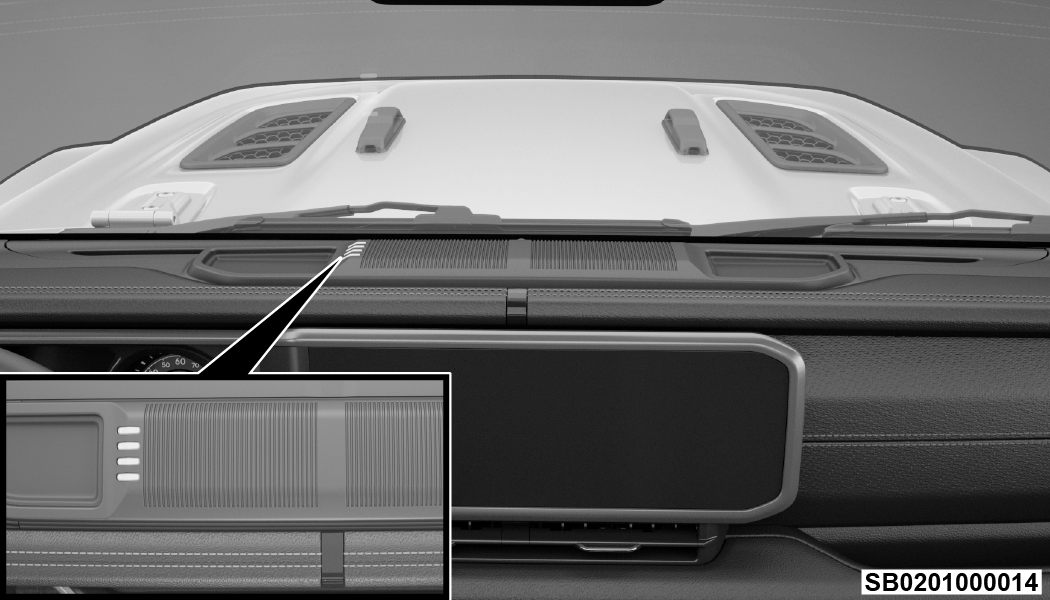
Instrument Panel State Of Charge
Indicator
In addition to the battery display in the instrument cluster, your vehicle is equipped with a visual SOC indicator. The SOC indicator is made up of four lights that are mounted to the top center of the instrument panel, which will illuminate when the vehicle is plugged into the charging system.
State Of Charge
Indicator
The SOC indicator provides a visual indication of the high voltage battery’s charge status during charging. It is also used to indicate a charging problem as well as waiting for a scheduled charge to begin.
Note:
The lights scroll one at a time when the vehicle is plugged in outside of its charging schedule time/day of the week, and it is waiting on the schedule to begin charging.
In extreme hot or cold environments, the lights on the SOC indicator may not illuminate. Charge status is available in the instrument cluster display. In the event of an error in the charging process, the outer two lights will blink.
When the hood is open, the lights on the SOC indicator will not be illuminated.
Indicator Lights
Illuminated
Percent Of Battery
Charge
1st light blinks
0 – 25%
1st light on, 2nd
light blinks
26 – 50%
1st and 2nd lights on,
3rd light blinks
51 – 75%
1st, 2nd, and 3rd
lights on, 4th light blinks
76 – 99%
All four lights on
100%
Two outer lights are
blinking
Indicates an error in
the charging process
Lights turn on one at
a time from left to right (when looking at the front of the
vehicle)
Indicates system is
waiting for scheduled time in charge schedule to begin charging
All lights turn on,
then immediately turn off
Indicates a successful
plug-in
Note:
For each segment of lights illuminated indicating the percent of battery charge, two different blink rates are used. A blink rate of 1 second on/1 second off indicates that the first half is charging. The blink rate will increase to 0.5 second on/0.5 second off to indicate that the second half is charging. When the battery is fully charged, the blinking stops and the lights remain illuminated as charging continues.
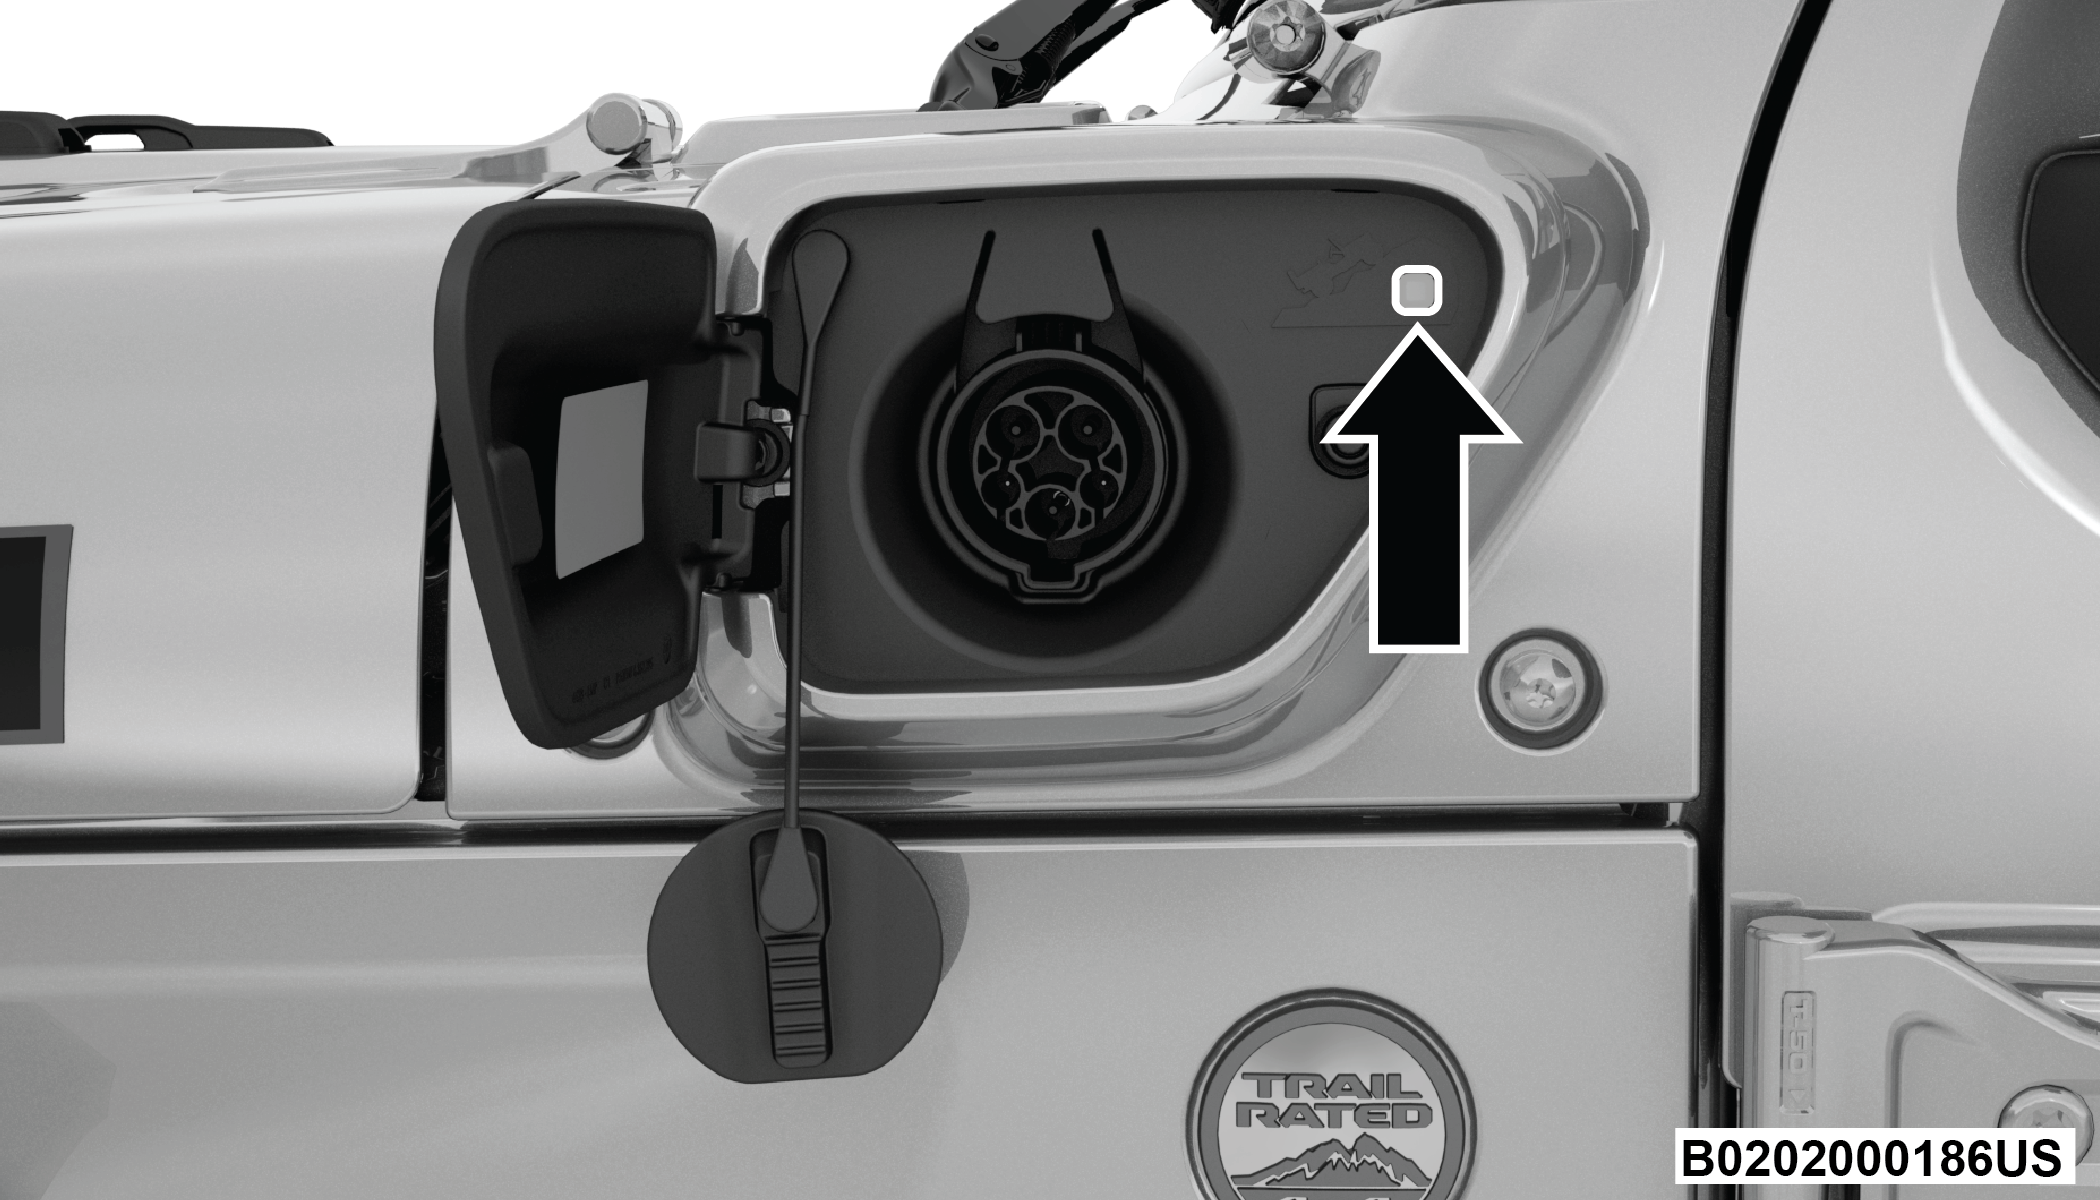
Next to the charging inlet, there is an LED that changes color based on charging status.
Charging Inlet LED Location
LED Charging Inlet
LED Light Color
Status
Blue
Indicates that the
system is waiting for a scheduled recharge.
Flashing Green
Charging process in
place.
Solid Green
Indicates the vehicle
is fully charged.
Blinking Red
Indicates a fault in
the charging system.
Hybrid Electric
Pages
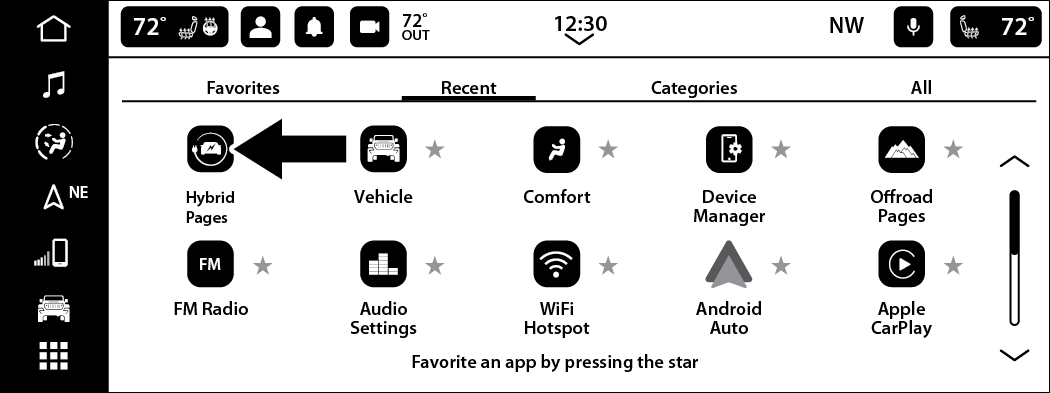
Within your Uconnect system is the Hybrid
Electric App that allows you to see your vehicle’s power flow, understand your driving
history, and set a charging schedule for your vehicle’s high voltage battery. To access this
app, press the Apps button on the main menu bar of the radio’s touchscreen, and locate the
Hybrid Electric App. Pressing the app icon brings you to a set of hybrid electric pages: Power
Flow, Driving History, Charging Schedule, and e-Save.
Apps Menu Screen
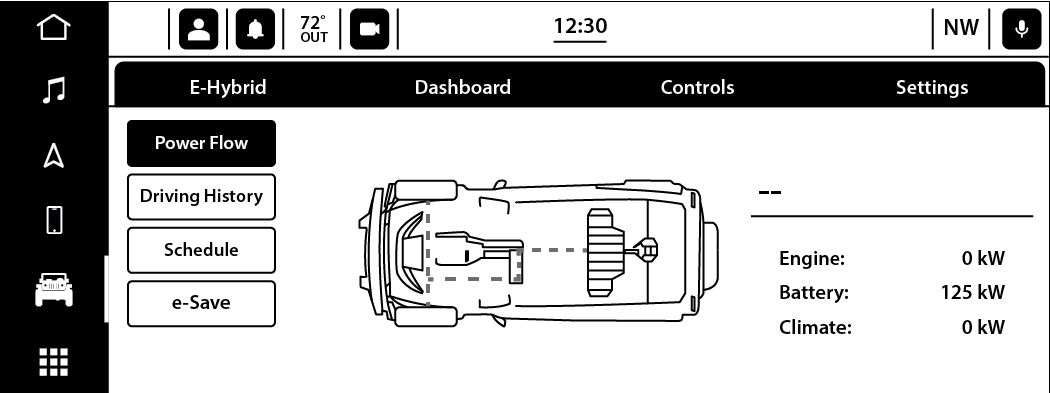
Power Flow
The Power Flow screen
shows the current power readings for all of the following:
Engine - Shows
the amount of power (in kW) the engine is generating. Based on vehicle
operating conditions, this power is used to: propel the vehicle, provide
passenger compartment heating, power vehicle electrical loads, and
charge the high voltage battery. Engine operation is controlled to
maximize fuel economy.
Battery - Shows
the amount of power (in kW) the high voltage battery is currently
providing/absorbing. A negative kW indicates the vehicle’s high voltage
battery is charging.
Climate - Shows
the amount of power (in kW) the Climate Control system is using to
maintain the current interior temperature.
Power Flow paths
are indicated by the direction of the arrows on the touchscreen.
Power Flow Screen
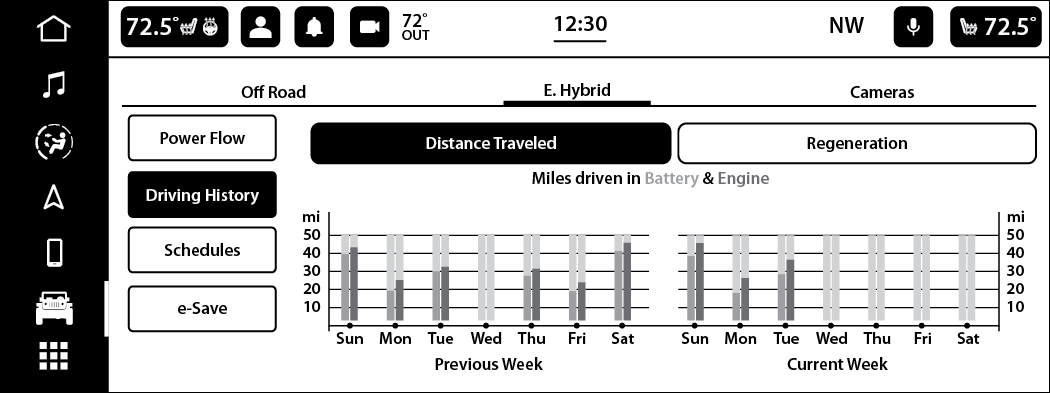
Driving History
The Driving History
screen shows the miles (km) driven in both Full Electric and Hybrid
(battery and engine powered) modes for both the previous week and
the current week. The data is displayed in a bar graph: Electric mode
in teal and Hybrid mode in blue.
On the bar graph,
miles (km) driven on the same day in Electric mode (battery only)
are always shown below miles (km) driven in Hybrid mode. When one
day of the week exceeds 100 miles (160 km) driven, the values for
miles (km) driven in Electric and Hybrid modes will be listed above
the bar graph in respective colors (teal for Electric and blue for
Hybrid).
Driving History Screen
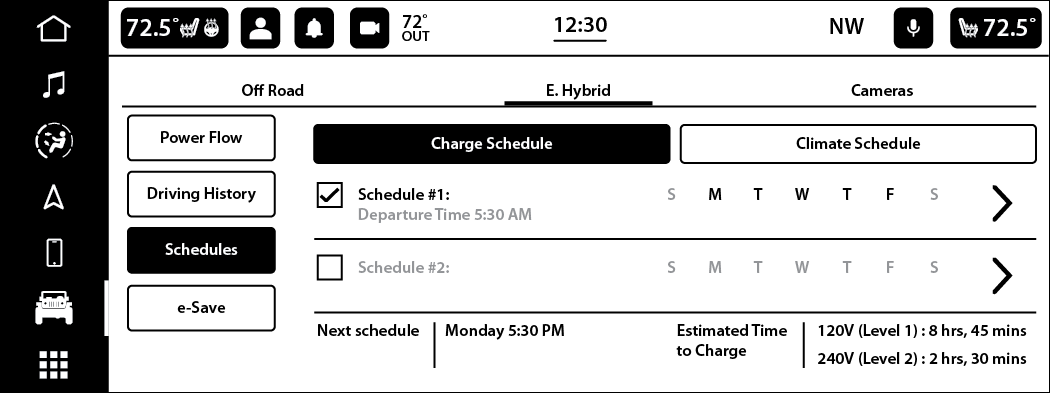
Charging Schedule
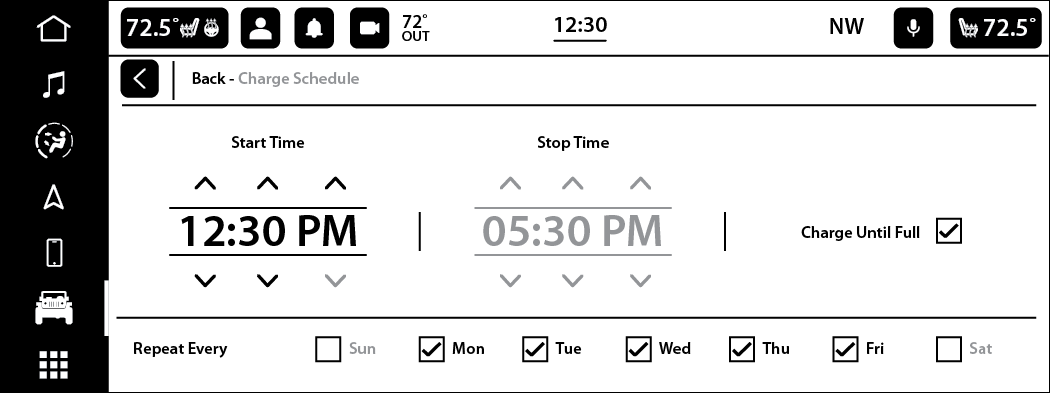
To set a charging
schedule, select the Hybrid Electric App on the touchscreen and follow
these steps:
Select “Schedules”.
Charging Schedules Screen
Select one of
the three charging schedules by pressing the appropriate arrow on
the right side of the screen.
Select if Scheduled
Charging should “Charge Until Full”.
Set the Charge
Start Time: Hours, Minutes, and AM/PM.
Note:
This is to occur every
week (as long as the vehicle is connected to a Charging Cable).
Set Charge Schedule
When done, press
the back arrow. The active schedule will be indicated by the check
mark to the right of the schedule event line. The Event Action and
Time will be displayed.
To add another
Scheduled Charging event, repeat these steps.
Note:
A maximum of two independent
Scheduled Charging events can be scheduled at a given time.
If “Charge Until
Full” is selected, the vehicle must be plugged in within five minutes
of the start time. The following are situations in which “Charge Until
Full” may not be honored:
If selected
for five days (Monday through Friday), and the vehicle is plugged
in five or more minutes after the start time on any of those days,
“Charge Until Full” will not be honored for that day. “Charge Until
Full” will resume on the next day at the scheduled time.
If there are
multiple plug/unplug events after first being plugged in within five
minutes, “Charge Until Full” will not be honored for that day.
If other schedules
(Charge Interval, etc.) are set at a later time in addition to “Charge
Until Full” being selected, and the vehicle is plugged in five or
more minutes after the scheduled start time, “Charge Until Full” will
not be honored for that day. The next available schedule will be followed.
Note:
If the charging
schedule is not enabled, the vehicle will charge whenever plugged
in. It is not necessary to set up the charging schedule to charge
the vehicle.
If the vehicle
is plugged in outside of the charging schedule set in the Uconnect
system (and Charge Until Full is not selected), the vehicle’s battery
will not charge. Charging will only begin immediately if the vehicle
is plugged in within the time and day of the week set in the schedule.
Otherwise, charging will automatically begin when the selected charge
time/day of the week occurs or whenever the vehicle is plugged in
with no charge schedule set.
Scheduled Charging
may be bypassed and charging will begin automatically if the high
voltage battery State Of Charge (SOC) is below its optimal operating
point.
If the vehicle
is turned off outside of the charging window, a radio pop-up message
will be displayed, which provides an option to begin charging the
vehicle immediately. The pop-up message asks the driver if they would
like to “Charge Now?” and provides other information, including the
next charging schedule start time and estimated time to charge the
battery to 100%. If within one hour of selecting “Yes,” the vehicle
is connected to a powered Charging Cable, the vehicle will immediately
begin to charge (temporarily ignoring any set charge schedule). To
fully deactivate the charge schedule, refer to the “Schedules” feature
within the Hybrid Electric App.
The charging
schedule can also be overridden if the Charging Cable is plugged in,
unplugged, and then plugged in a second time to the vehicle. After
the first plug in ofthe vehicle, wait until the battery charge indicator
on the instrument panel lights up before unplugging. This “double
plug sequence” will override the schedule that is set in the radio,
and begin charging the vehicle immediately. The double plug sequence
must be completed within 10 seconds for it to override the programmed
schedule.
If “Charge Until
Full” is selected, and the vehicle is plugged in after the start time
of the schedule, the vehicle will start charging when it reaches the
start time the next day. If you would like to begin charging immediately,
and continue charging until the vehicle is fully charged, you can
select the “Charge Now” option or use the double plug override option.
There is also a
Climate Schedule which can be set and managed for climate or cabin
conditioning.
Schedule Bypass
Note:
If the vehicle is turned off outside of the charging
window, a radio pop-up message will be displayed. The pop-up message
asks the driver if they would like to “Charge Now?” and provides
the next charging schedule start time and estimated time to charge
the battery to 100%. If within one hour of selecting “Yes”, the
vehicle is connected to a powered EVSE, the vehicle will immediately
begin to charge (temporarily ignoring any set charge schedule).
To fully deactivate the charge schedule, select the “Enable Schedule”
checkbox until the check mark is removed from the box.
The
charging schedule can also be overridden if an EVSE is plugged in,
unplugged, and then plugged in a second time to the vehicle. This
double plug sequence will override the set schedule in the Hybrid
Electric Pages App, and begin charging the vehicle immediately.
The double plug sequence must be completed within 10 seconds for
it to override the programmed schedule.
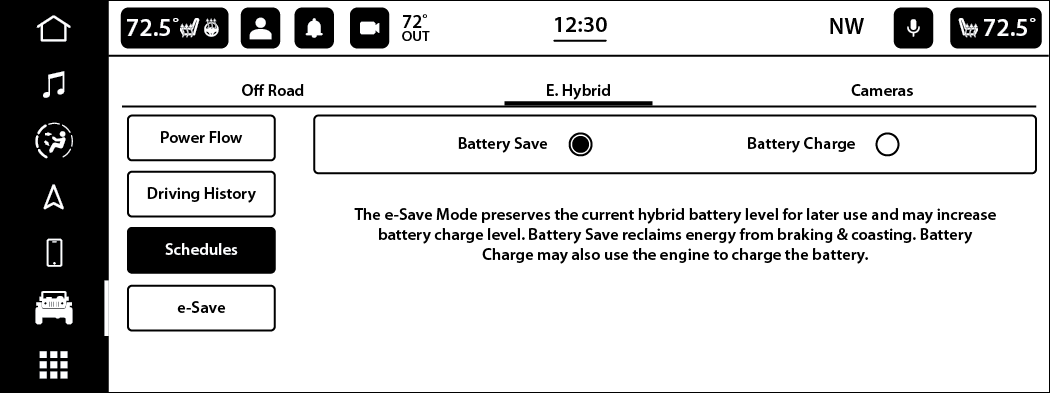
e-Save
The fourth screen
within the Hybrid Electric Pages App is the e-Save screen. From this
screen, you can specify the behavior of the e-Save drive mode:
e-Save Screen
Battery Save
- Maintains the high voltage State of Charge at its current level
under most driving scenarios.
Note:
The SOC may increase
if there is sufficient energy capture through regenerative braking.
Battery Charge
- Uses additional power from the gas engine to increase the high voltage
State of Charge, up to 95% capacity.
Note:
For information on
jump starting your vehicle, JUMP STARTING.