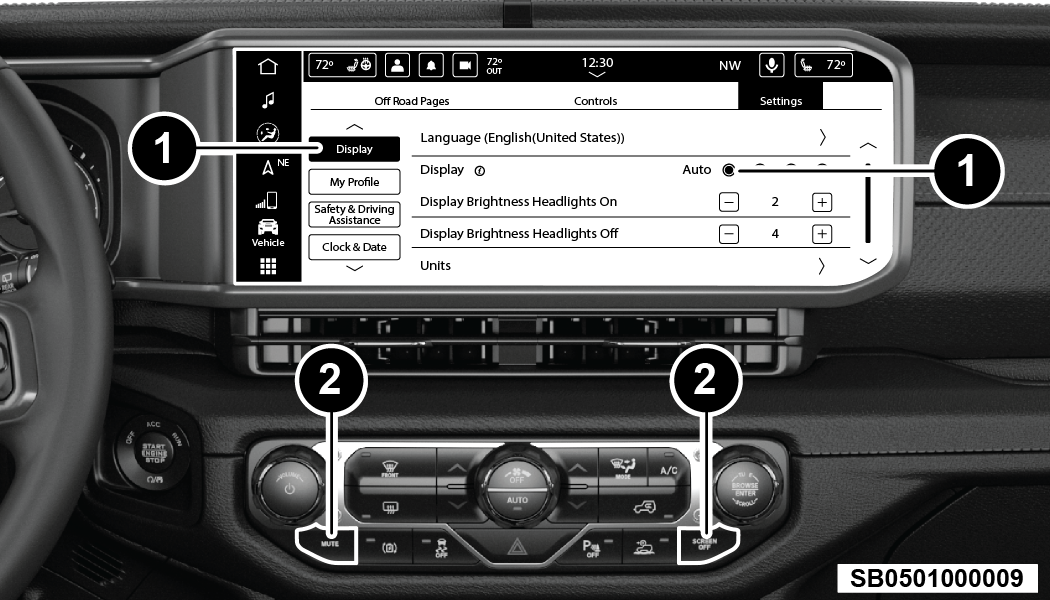
The Uconnect system uses a combination of buttons on the touchscreen and buttons on the faceplate located on the center of the instrument panel. These buttons allow you to access and change the Customer Programmable Features. Many features can vary by vehicle.
Buttons on the faceplate are located below and/or beside the Uconnect system in the center of the instrument panel. In addition, there is a SCROLL/ENTER control knob located on the right side. Turn the control knob to scroll through menus and change settings. Push the center of the control knob one or more times to select or change a setting.
Your Uconnect system may also have SCREEN OFF and MUTE buttons on the faceplate.
Push the SCREEN OFF button on the faceplate to turn off the Uconnect screen. Push the button again or tap the screen to turn the screen on.
Press the Back Arrow button to exit out of a Menu or certain option on the Uconnect system.

Uconnect 5 NAV With 12.3-inch Display Touchscreen And Faceplate Buttons
|
1 — Uconnect Buttons On The Touchscreen |
|
2 — Uconnect Buttons On The Faceplate |
For The Uconnect 5 NAV With 12.3-inch Display
Press the Vehicle button, then press the Settings tab at the top of the touchscreen. In this menu, the Uconnect system allows you to access all of the available programmable features.
Depending on the vehicle’s options, feature settings may vary.
All settings should be changed with the ignition in the ON/RUN position.
When making a selection, press the button on the touchscreen to enter the desired menu. Once in the desired menu, press and release the preferred setting option until a check mark appears next to the setting, showing that setting has been selected. Once the setting is complete, press the Vehicle button to exit to the screen. Pressing the Up or Down Arrow button on the right side of the screen will allow you to toggle up or down through the available settings.
|
When the Display button is pressed on the touchscreen, the system will display the options related to the theme (if equipped), brightness, and color of the touchscreen. The available settings are: Note:
Depending on the vehicle’s options, feature settings may vary. |
|
Setting Name |
Description |
|---|---|
|
Language |
This setting will change the language of the Uconnect system and Instrument Cluster Display. The available languages are Español (Mexico), English (United States), Italiano, and Français (Canada). |
|
Display Mode |
This setting will allow you to set the brightness manually or have the system set it automatically. The “Auto” setting has the system automatically adjust the display brightness. The “Manual” setting will allow the user to adjust the brightness of the display. |
|
Theme Mode |
This setting will allow you to adjust the brightness of your theme. Setting options are “Light”, “Dark” and “Auto”. Select to show Themes in Light or Dark mode. "Auto" changes the theme with the headlights. |
|
Set Theme |
This setting will allow you to change the display theme. |
|
Units |
This setting will allow you to customize the units for “Speed” (mph or km/h), “Distance” (mi or km), “Fuel Consumption” (MPG [US], MPG [UK], L/100 km, or km/L), “Pressure” (psi, kPa, or bar), “Temperature” (°C or °F), and “Torque” (Nm or lb-ft) units of measurement independently. |
|
Touchscreen Beep |
This setting will allow you to turn the touchscreen beep on or off. |
|
Show Main Category Bar Labels |
This setting will allow the main category bar labels to be shown on or off. |
|
Display Brightness Nighttime |
Only available if Display Mode is set to “Manual”. This setting will allow you to adjust the “Brightness Nighttime” setting. Selectable options are 1 through 10. |
|
Display Brightness Daytime |
Only available if Display Mode is set to “Manual”. This setting will allow you to adjust the “Brightness Daytime” setting. Selectable options are 1 through 10. |
|
Cluster Options |
This settings allows users to select which content to display in each customizable area on the Instrument Cluster Display. |
|
Warning Cluster Buzzer Volume |
This setting will let you adjust the Warning Cluster Buzzer Volume. Selectable options are “Low”, “Mid”, and “High”. |
|
Navigation Turn-by-Turn Displayed in Cluster |
This setting will display Navigation prompts in the Instrument Cluster Display. |
|
Phone Pop-ups Displayed In Cluster |
This setting will display smartphone notifications and messages in the Instrument Cluster Display. |
|
Auto Launch with Off-Road+ |
This setting will determine how the Off-Road feature is launched through the radio when turning the vehicle on. The options are “Off”, “Forward Camera” (if equipped), and “Off Road Pages”. |
|
When the My Profile button is pressed on the touchscreen, the system displays options related to the vehicle’s profiles. Note:
Depending on the vehicle’s options, feature settings may vary. |
|
Setting Name |
Description |
|---|---|
|
Language |
This setting will change the language of the Uconnect system and Instrument Cluster Display. The available languages are Español (Mexico), English (United States), Italiano, and Français (Canada). |
|
Display Mode |
This setting will adjust the display for the radio to “Auto” or “Manual”. “Manual” allows for more customization with the radio display. |
|
Display Brightness Nighttime |
This setting will allow you to adjust the “Brightness Nighttime” setting. Selectable options are 1 through 10. |
|
Display Brightness Daytime |
This setting will allow you to adjust the “Brightness Daytime” setting. Selectable options are 1 through 10. |
|
Theme Mode |
This setting will allow you to adjust the brightness of your theme. Setting options are “Light”, “Dark” and “Auto”. Select to show Themes in Light or Dark mode. "Auto" changes the theme with the headlights. |
|
Set Theme |
This setting will allow you to change the display theme. |
|
Units |
This setting will allow you to customize the units for “Speed” (mph or km/h), “Distance” (mi or km), “Fuel Consumption” (MPG [US], MPG [UK], L/100 km, or km/L), “Pressure” (psi, kPa, or bar), “Temperature” (°C or °F), and “Torque” (Nm or lb-ft) units of measurement independently. |
|
Touchscreen Beep |
This setting will allow you to turn the touchscreen beep on or off. |
|
Show Main Category Bar Labels |
This setting will allow the main category bar labels to be shown on or off. |
|
Time Format |
This setting will allow you to set the time format (AM/PM). Sync Time With GPS must be “Off” for this setting to be available. The “12 hrs” setting will set the time to a 12-hour format. The “24 hrs” setting will set the time to a 24-hour format. |
|
Voice Options |
This setting will allow you to change the voice options for the radio to “Male” or “Female”. |
|
Wake Up Word |
This setting will allow you to set the system “Wake Up” word. The available options are “Off”, “Hey, Uconnect”, and “Hey, Jeep”. |
|
Voice Barge-in |
This setting will allow Voice Barge-in to be turned on or off. |
|
Show Command List |
This setting will allow the Command List to be shown on or off. |
|
Navigation Settings |
This setting will redirect to the list of Navigation settings. Refer to your Uconnect Radio Instruction Manual for further information. |
|
Auto-On Driver Heated/Ventilated Seat & Heated Steering Wheel |
This setting will activate the vehicle’s comfort system and heated seats or heated steering wheel when the vehicle is remote started or ignition is started. The “Off” setting will not activate the comfort systems. The “Remote Start” setting will only activate the comfort systems when using Remote Start. The “All Start” setting will activate the comfort systems whenever the vehicle is started. |
|
Radio Off Delay |
This setting will keep certain electrical features running after the engine is turned off. When any door is opened, the electronics will deactivate. The available settings are “0 min” and “20 min”. |
|
Radio Off With Door |
This setting will allow you to determine if the radio shuts off when any of the doors are opened. |
|
Audio Settings |
This setting will open the submenu, containing the audio settings. For more information about audio settings, please refer to the Uconnect Radio Instruction Manual. |
|
App Drawer Favoriting Pop-ups |
This setting will allow you to favorite app drawer pop-ups with “On” and “Off” options. |
|
App Drawer Unfavoritings Pop-ups |
This setting will allow you to unfavorite app drawer pop-ups with “On” and “Off” options. |
|
New Text Message Pop-ups |
This setting will allow you to have pop-up notifications for new text messages. Setting options are “On” and “Off”. |
|
Missed Calls Message |
This setting will allow you to have pop-up notifications for missed calls. Setting options are “On” and “Off”. |
|
Navigation Pop-ups |
This setting will allow you to have pop-up notifications for Navigation. Setting options are “On” and “Off”. |
|
Reset App Drawer to Default Order |
This setting will reset the app drawer to its factory default layout. |
|
Restore Settings to Default |
This setting will return all the previously changed settings to their factory defaults. |
|
More Profile Options |
This setting will give access to more profile options. |
|
Warning Cluster Buzzer Volume |
This setting will let you adjust the Warning Cluster Buzzer Volume. Selectable options are “Low”, “Mid”, and “High”. |
|
Cluster Options |
This setting will display options for the cluster using the Uconnect touchscreen. Options include “Trip B On Cluster”, “Custom Areas on Cluster”, and “Widget List”. |
|
Auto-On Comfort |
This setting will activate the vehicle’s comfort systems and heated seats or heated steering wheel when the vehicle is remote started or ignition is started. The “Off” setting will not activate the comfort systems. The “Remote Start” setting will only activate the comfort systems when using Remote Start. The “All Start” setting will activate the comfort systems whenever the vehicle is started. |
|
Navigation Turn-by-Turn Displayed in Cluster |
This setting will display Navigation prompts in the Instrument Cluster Display. |
|
Phone Pop-ups Displayed In Cluster |
This setting will display smartphone notifications and messages in the Instrument Cluster Display. |
|
When the Safety/Driving Assistance button is pressed on the touchscreen, the system displays the options related to the vehicle’s safety settings. These options will differ depending on the features equipped on the vehicle. The settings may display in list form or within subfolders on the screen. To access a subfolder, select the desired folder; the available options related to that feature will then display on the screen. Note:
Depending on the vehicle’s options, feature settings may vary. |
|
Setting Name |
Description |
|---|---|
|
Forward Collision Warning — Located In Automatic Emergency Braking Submenu |
This setting will turn the Forward Collision Warning (FCW) system on or off. The “Off” setting will deactivate the FCW system. The “Warning Only” setting will provide only an audible chime when a collision is detected. The “Warning + Active Braking” setting will provide an audible chime and apply some brake pressure when a collision is detected. |
|
Forward Collision Warning Sensitivity — Located In Automatic Emergency Braking Submenu |
This setting will change the distance at which the Forward Collision Warning alert sounds. The “Medium” setting will have the FCW system signal when an object is in view, and the possibility of a collision is detected. The “Near” setting will have the FCW system signal when the object is closer to the vehicle. The “Far” setting will have the FCW system signal when an object is at a far distance from the vehicle. |
|
ParkSense |
This setting will change the type of ParkSense alert when a close object is detected and can provide both an audible chime and a visual display. |
|
Front ParkSense Volume |
This setting adjusts the volume of the Front ParkSense system. The available settings are “Low”, “Medium”, and “High”. |
|
Rear ParkSense Volume |
This setting adjusts the volume of the Rear ParkSense system. The available settings are “Low”, “Medium”, and “High”. |
|
Rear ParkSense Braking Assist |
This setting will provide braking assistance if the Rear ParkSense system senses a collision with an object. |
|
Blind Spot Alert |
This setting will change the type of alert provided when an object is detected in the vehicle’s blind spot. The “Off” setting will turn off Blind Spot Alert. The “Lights” setting will activate the Blind Spot Alert lights on the outside mirrors. The “Lights & Chime” setting will activate both the lights on the outside mirrors and an audible chime. |
|
Traffic Sign Recognition |
This setting will turn Traffic Sign Recognition on or off. |
|
Traffic Sign Assist |
This setting will turn Traffic Sign Assist on or off. |
|
Traffic Sign Assist Warning |
This setting will allow you to set the warning type related to the traffic sign. The available options are “Off”, “Visual”, and “Visual + Chime”. |
|
New Speed Zone Indication |
This setting will allow you to set if the system will warn you that the speed limit has changed in an area. The available options are “Off”, “Visual”, and “Visual + Chime”. |
|
Drowsy Driver Alert |
This setting will monitor the driver’s driving habits and warn you of any changes, indicating that the driver may be drowsy. The available options are “On” and “Off”. |
|
Highway Assist Steering Wheel Vibration |
This setting will customize the Highway Assist Steering Wheel Vibration. The available options are “On” and “Off”. |
|
Tire Fill Assist |
This setting will turn Tire Fill Assist on or off. |
|
Hill Start Assist |
This setting will turn the Hill Start Assist system on or off. |
|
Intelligent Speed Options |
This setting will let you customize your Intelligent Speed Options. Selectable options are “Manual Confirm” and “Auto Confirm”. |
|
New Speed Zone Indication |
This setting will allow you to set if the system will warn you that the speed limit has changed in an area. The available options are “Off”, “Visual”, and “Visual + Chime”. |
|
Rear Seat Alert |
When this setting is turned on and the rear doors are opened while the engine is running, or if the engine is turned on within 10 minutes of the door opening, a message will appear to check the rear seat when the vehicle is powered OFF. |
|
Front Passenger Airbag |
This setting will let you enable or disable the Front Passenger Airbag. |
|
Power Side Step |
This setting will activate the Power Side Step. The “Auto” setting will lower the step when the door is opened and retract it once the door is closed. The “Off” setting will deactivate the feature. |
|
When the Clock & Date button is pressed on the touchscreen, the system displays the different options related to the vehicle’s internal clock. Note:
Depending on the vehicle’s options, feature settings may vary. |
|
Setting Name |
Description |
|---|---|
|
Sync Time With GPS |
This setting will sync the time to the GPS receiver in the system. The system will control the time via the GPS location. |
|
Set Time |
This setting will allow you to set the hours and minutes. Sync Time With GPS must be off for this setting to be available. The “+” setting will increase the hours or minutes. The “-” setting will decrease the hours or minutes. |
|
Time Format |
This setting will allow you to set the time format (AM/PM). Sync Time With GPS must be off for this setting to be available. The “12 hrs” setting will set the time to a 12-hour format. The “24 hrs” setting will set the time to a 24-hour format. You will also be able to adjust the clock. |
|
Set Date |
This setting will allow you to set the date. |
|
Show Time in Status Bar |
This setting will place the time in the radio’s status bar. |
|
Show Time and Date During Screen Off |
This setting will allow you to show the time and date while the screen is off. Available options are “On” and “Off”. |
|
When the Phone/Bluetooth® button is pressed on the touchscreen, the system displays the options related to Bluetooth® connectivity from an external audio device or smartphone. The list of paired audio devices or smartphones can be accessed from this menu. Note:
Depending on the vehicle’s options, feature settings may vary. |
|
Setting Name |
Description |
|---|---|
|
Device Manager |
This setting will open the Device Manager main screen. |
|
Do Not Disturb All |
This setting will open the Do Not Disturb All Settings menu. The available options are “On” and “Off”. |
|
Enable Two Active Phones |
This setting will enable or disable two active phones within the vehicle. The setting options are “On” and “Off”. |
|
Phone Pop-Ups Displayed In Cluster |
This setting will activate phone message pop-ups in the Instrument Cluster Display. |
|
When the Voice button is pressed on the touchscreen, the system displays the options related to the vehicle’s Voice Recognition feature. Note:
Depending on the vehicle’s options, feature settings may vary. |
|
Setting Name |
Description |
|---|---|
|
Voice Options |
This setting will allow you to change the system’s voice to either “Male” or “Female”. |
|
Wake Up Word |
This setting will allow you to set the system’s “Wake Up” word. The available options are “Off”, “Hey, Uconnect”, and “Hey, Jeep”. |
|
Voice Barge-In |
This setting allows you to respond to a Voice Response before the statement is completed by the system. The available options are “On” and “Off”. |
|
Show Command List |
This setting will allow you to turn the Command List on or off. The “Always” setting will always show the Command List. The “With Help” setting will show the Command List and provide a brief description of what the command does. The “Never” setting will turn the Command List off. |
|
When the Navigation button is pressed on the touchscreen, the system displays options related to the vehicle’s built-in Navigation system. These settings can change which icons display on the map, how “time to arrival is calculated”, and route types. For more information on Navigation and settings, refer to your Uconnect Radio Instruction Manual. |
|
When the Camera button is pressed on the touchscreen, the system displays the options related to the vehicle’s camera features. Note:
Depending on the vehicle’s options, feature settings may vary. |
|
Setting Name |
Description |
|---|---|
|
ParkView Backup Camera Delay |
This setting will add a timed delay to the ParkView Backup Camera when shifting out of REVERSE. |
|
ParkView Backup Camera Active Guidelines |
This setting will turn the ParkView Backup Camera Active Guidelines on or off. |
|
ParkView Backup Camera Fixed Guidelines |
This setting will turn the ParkView Backup Camera Fixed Guidelines on or off. |
|
Forward Facing Camera Guidelines |
This setting will turn the Forward Facing Camera Guidelines on or off. |
|
When the Mirrors & Wipers button is pressed on the touchscreen, the system displays the option related to the vehicle’s mirrors and wipers. Note:
Depending on the vehicle’s options, feature settings may vary. |
|
Setting Name |
Description |
|---|---|
|
Headlights With Wipers |
This setting will turn the headlights on when the wipers are activated. |
|
When the Lights button is pressed on the touchscreen, the system displays the options related to the vehicle’s exterior and interior lights. Note:
|
|
Setting Name |
Description |
|---|---|
|
Headlight Off Delay |
This setting will allow you to set the amount of time it takes for the headlights to shut off after the vehicle is turned off. The available settings are “0 sec”, “30 sec”, “60 sec”, and “90 sec”. |
|
Illuminated Approach |
This setting will allow you to set the amount of time it takes for the headlights to shut off after the vehicle is unlocked. The available settings are “0 sec”, “30 sec”, “60 sec”, and “90 sec”. |
|
Headlights With Wipers |
This setting will turn the headlights on when the wipers are activated. |
|
Auto Dim High Beams |
This setting will allow you to turn the Auto Dim High Beams on or off. |
|
Daytime Running Lights |
This setting will allow you to turn the Daytime Running Lights on or off. |
|
Flash Lights With Lock |
This setting will allow you to turn the flashing of the lights when the Lock button is pushed on the key fob on or off. |
|
Interior Ambient Lights |
This setting will allow you to turn the Interior Ambient Lights on or off. |
|
When the Doors & Locks button is pressed on the touchscreen, the system displays the options related to locking and unlocking the vehicle’s doors. Note:
Depending on the vehicle’s options, feature settings may vary. |
|
Setting Name |
Description |
|---|---|
|
Auto Door Locks |
This setting will allow you to change if the doors lock automatically when the vehicle reaches 15 mph (24 km/h). |
|
Auto Unlock On Exit |
This setting will unlock the doors when any of the doors are opened from the inside. |
|
Flash Lights With Lock |
This setting will allow you to turn the flashing of the lights when the Lock button is pushed on the key fob on or off. |
|
Sound Horn With Lock |
This setting will sound the horn when the Lock button is pushed on the key fob. The “Off” setting will not sound the horn when the Lock button is pushed. The “1st Press” setting will sound the horn when the Lock button is pushed once. The “2nd Press” setting will sound the horn when the Lock button is pushed twice. |
|
Sound Horn With Remote Start |
This setting will sound the horn when the remote start is activated from the key fob. |
|
1st Press Of Key Fob Unlocks |
This setting will change how many pushes of the Unlock button on the key fob are needed to unlock all the doors. The “Driver Door” setting will only unlock the driver door on the first push on the Unlock button. The “All Doors” setting will unlock all doors with only one push of the Unlock button. |
|
Passive Entry |
This setting will allow you to turn the Passive Entry feature (Keyless Enter ‘n Go™) on or off. |
|
When Seats & Comfort button is pressed on the touchscreen, the system displays the option related to the vehicle’s comfort systems when remote start has been activated or the vehicle has been started. Note:
Depending on the vehicle’s options, feature settings may vary. |
|
Setting Name |
Description |
|---|---|
|
Auto-On Heated Seat & Steering Wheel |
This setting will activate the vehicle’s comfort system and heated seats or heated steering wheel when the vehicle is remote started or ignition is started. The “Off” setting will not activate the comfort systems. The “Remote Start” setting will only activate the comfort systems when using Remote Start. The “All Start” setting will activate the comfort systems whenever the vehicle is started. |
|
When the AUX Switches button is pressed on the touchscreen, the system displays the option related to the four vehicle AUX switches. Note:
Depending on the vehicle’s options, feature settings may vary. |
|
Setting Name |
Description |
|---|---|
|
AUX 1-4 |
This setting will adjust the type and power source for the four vehicle AUX switches. There are two types: “Latching” and “Momentary”. The power source for the AUX switches can either be set to run off the “Battery” or from the “Ignition”. In addition to setting the type and power source, you can set if the vehicle will recall the previous state at which the AUX switches were set. The Recalled Last State setting can be set to “On” or “Off”. Last state conditions are met only if the type is set to Latching and the power source is set to Ignition. |
|
After pressing the Key Off Options button on the touchscreen, the following settings will be available: Note:
Depending on the vehicle’s options, feature settings may vary. |
|
Setting Name |
Description |
|---|---|
|
Doors On Key Off Power Delay |
This setting will keep certain electrical features running after the engine is turned on. When any door is opened, the electronics will deactivate. The available settings are “0 sec”, “45 sec”, “5 min”, and “10 min”. |
|
Doors Off Key Off Power Delay |
This setting will keep certain electrical features running after the engine is turned off. When any door is opened, the electronics will deactivate. The available settings are “0 sec”, “45 sec”, “5 min”, and “10 min”. |
|
Headlight Off Delay |
This setting will allow you to set the amount of time it takes for the headlights to shut off after the vehicle is turned off. The available settings are “0 sec”, “30 sec”, “60 sec”, and “90 sec”. |
|
When the Audio button is pressed on the touchscreen, the system displays options related to the vehicle’s sound system. These settings can change the audio location within the vehicle, adjust the bass or treble levels, and auto-play settings from an audio device or smartphone. Note:
Depending on the vehicle’s options, feature settings may vary. |
|
Setting Name |
Description |
|---|---|
|
Balance/Fade |
This setting will adjust audio levels from specific speakers in the front/back and left/right of the vehicle. The Speaker icon can be moved to set audio location. |
|
Equalizer |
This setting will adjust the “Bass”, “Mid”, and “Treble” ranges of the audio. |
|
Speed Adjusted Volume |
This setting will adjust audio volume as speeds increase. At a higher setting, the volume will increase more as the vehicle speeds up. The available settings are “Off”, “1”, “2”, and “3”. |
|
AUX Volume Offset |
This setting will tune the audio levels from a device connected through the AUX port. The available settings are “+” and “-”. |
|
Auto Play |
This setting will automatically begin playing audio from a connected device. |
|
Surround Sound |
This setting will turn the Surround Sound system on or off. |
|
Loudness |
This setting will improve sound quality at lower volumes when enabled. |
|
When the SiriusXM® Setup button is pressed on the touchscreen, the system displays the options related to SiriusXM® satellite radio. These settings can be used to skip specific radio channels and restart favorite songs from the beginning. Note:
|
|
Setting Name |
Description |
|---|---|
|
SiriusXM® Account, Profile, And Settings |
This setting will redirect you to the SiriusXM® Settings menu within the SiriusXM® menu. |
|
Block Explicit |
This setting will skip over content labeled as explicit. The available settings are “On” and “Off”. |
|
When the Reset button is pressed on the touchscreen, the system displays the options related to resetting the Uconnect system back to its default settings. These settings can clear personal data and reset selected settings from other menus. Note:
Depending on the vehicle’s options, feature settings may vary. |
|
Setting Name |
Description |
|---|---|
|
Reset App Drawer To Default Order |
This setting will reset the app drawer to its factory default layout. |
|
Restore Apps |
This setting will restore all installed apps. This feature is used if there is an issue using or installing apps. |
|
Restore Settings to Default |
This setting will return all the previously changed settings to their factory defaults. |
|
Clear Personal Data |
This setting will display a pop-up that gives you the option to clear all personal data from the system, including Bluetooth® devices and presets. |
|
When the System Information button is pressed on the touchscreen, the system displays the radio system information. Note:
Depending on the vehicle’s options, feature settings may vary. |
|
Setting Name |
Description |
|---|---|
|
Software Licenses |
This will display the software licensing information screen. |
|
Version Information |
When this feature is selected, a Version Information screen will appear, displaying information about the version of your radio. |
|
License Information |
When this feature is selected, a License Information screen will appear, displaying the licensing information of your radio. |